

Most of us have projects and for many people, us included, the entire build process can take months, even years, to complete. Wouldn’t it be nice if a ton of people showed up and you were able to knock it out in a week? Well, that’s what we thought. We’ve done build projects before and it generally takes at least a year to get from boring to badass, so we decided to completely transform cars from stock to custom in a very short seven days. And, with that, the Super Chevy Week to Wicked Presented by CCP series was launched.
Of course, there was a lot of time spent getting all of our proverbial ducks lined up before a single wrench was turned. We had to have plan, pick compatible parts, and try to think of all the little things that could grind the build to a halt.
The car this time around is a 1972 Camaro. It came to us without an engine or trans and was somebody’s stalled-out project. Our guess was the original builder was going for a custom deal given the smoothed firewall, color-matched inner fenders, and body-colored underside. In the plus category, the Camaro was super clean with a freshly powdercoated subframe and not a spot of grease anywhere. In the minus category, all the missing parts and unknown bodywork, which included a very warped and overly tall 4-inch cowl hood.
We typically start these projects with a complete, running car so first up was dropping in a spare drivetrain and getting the Camaro to a stockish state. After all, it would be cheating a bit if we pushed a stripped down shell into the tech center to begin the build. Besides, driving it in stock form gives us something to compare the finished car to.
So, with a plan in hand, a whole lot of help, and a rather mundane second-gen Camaro, we set out to give the stalled F-body a complete makeover and get it back on the street, and the track, where it belongs.
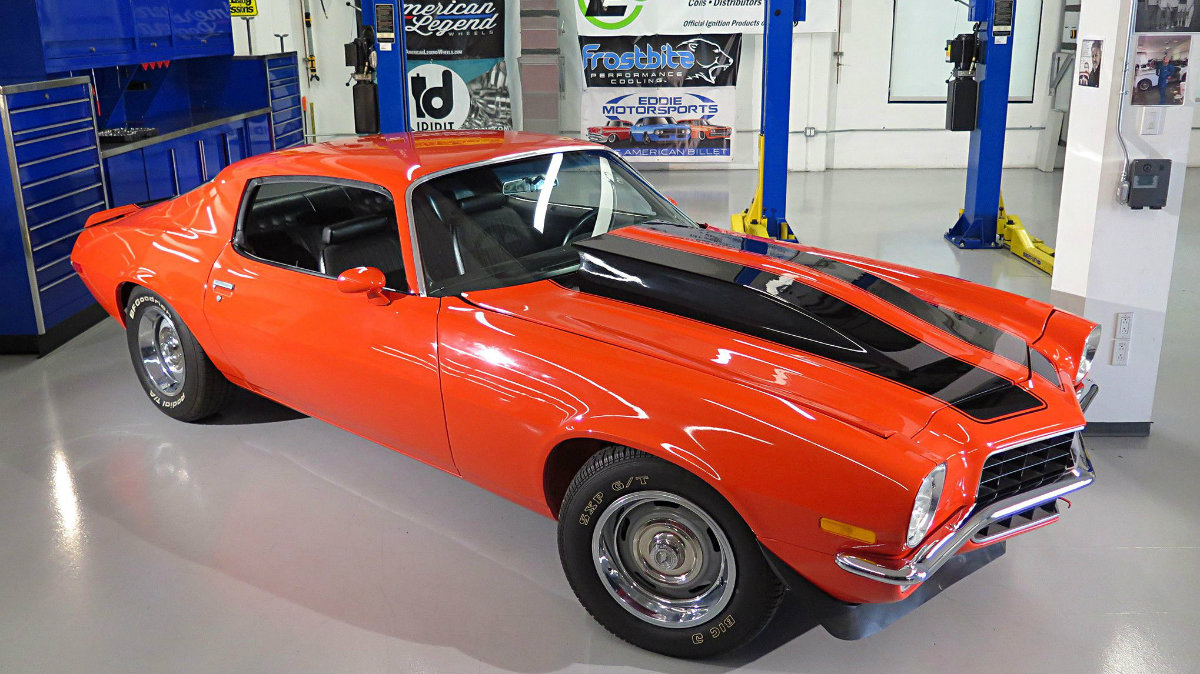
1. Behold our starting point: a Hugger Orange 1972 Camaro. The paint was decent but we bought it as an unfinished project car so we spent some time getting the Camaro into a semi-restored and driveable condition before the actual build. The ill-fitting 4-inch cowl hood was at the top of our list in terms of things that had to go.

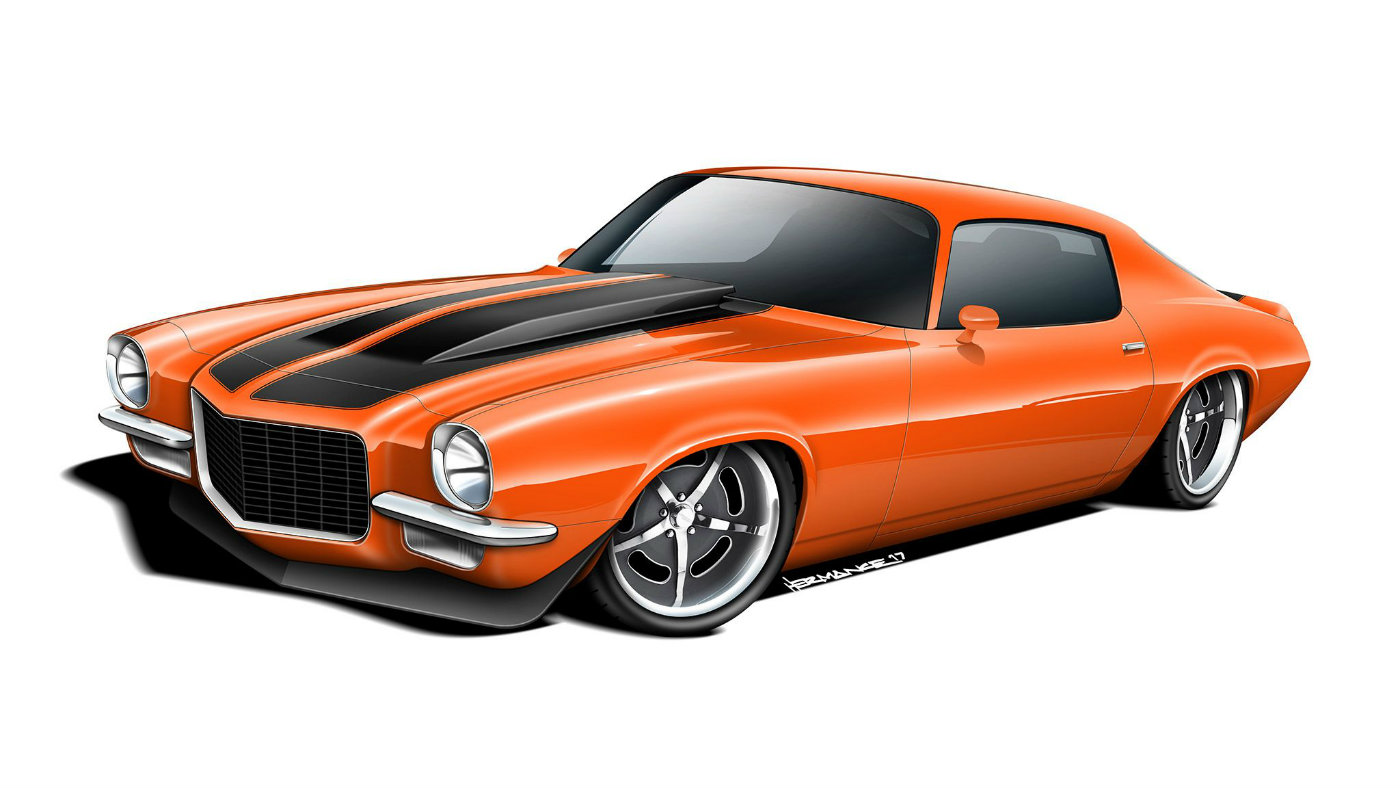
2. And this is where we were trying to get. But this badass rendering by Ben Hermance doesn’t show tons of mechanical parts that were getting swapped out. It was going to be a long week, and we were dying to get started.
3. We had seven days to get our rebuild done so we decided to spend a long day before the official start knocking out the Classic Performance Products (CPP) wide wheeltub kit. In short, the inner rear wheelhouse is cut out, moved inboard, and then the resulting gap is bridged with a slick piece from CPP. This, along with a few other parts, will let us run the massive 315/30R18 RT615K+ Falken tires. With that completed, one day was gone with six to go.
4. Day one of the official build started off with a complete teardown of the Camaro. The drivetrain along will all of the suspension and wiring was yanked so we could get busy installing the new parts.
5. With our tech center crew (Jason Scudellari and Christian Arriero) and the guys from CPP attacking the Camaro, it was only a couple of hours before all of the old parts were off the car.
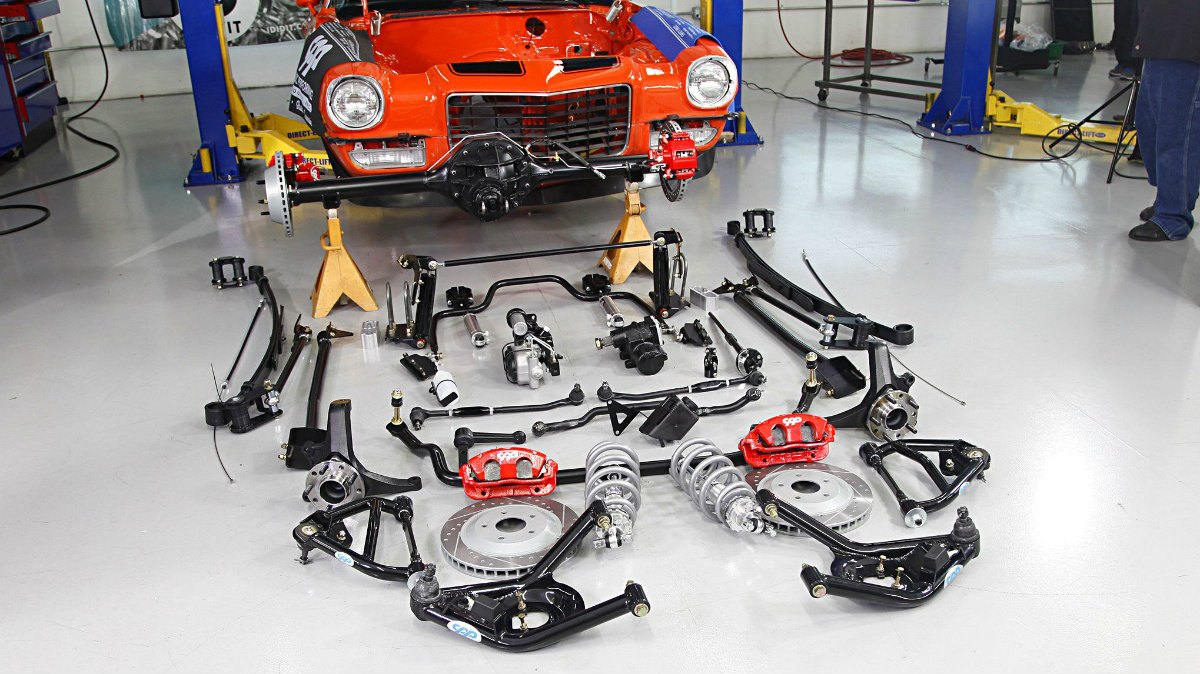
6. The first new parts to go on were the suspension, braking, and steering parts from CPP. This kit is a lot like their PTK4 offering, but with a few upgrades and a couple of new items such as the subframe connectors and shock relocating system.
7. The chassis upgrade also included swapping to Energy Suspension polyurethane subframe bushings and fresh Grade 8 hardware. The poly bushings will firm up the chassis without being overly harsh like solid mounts.
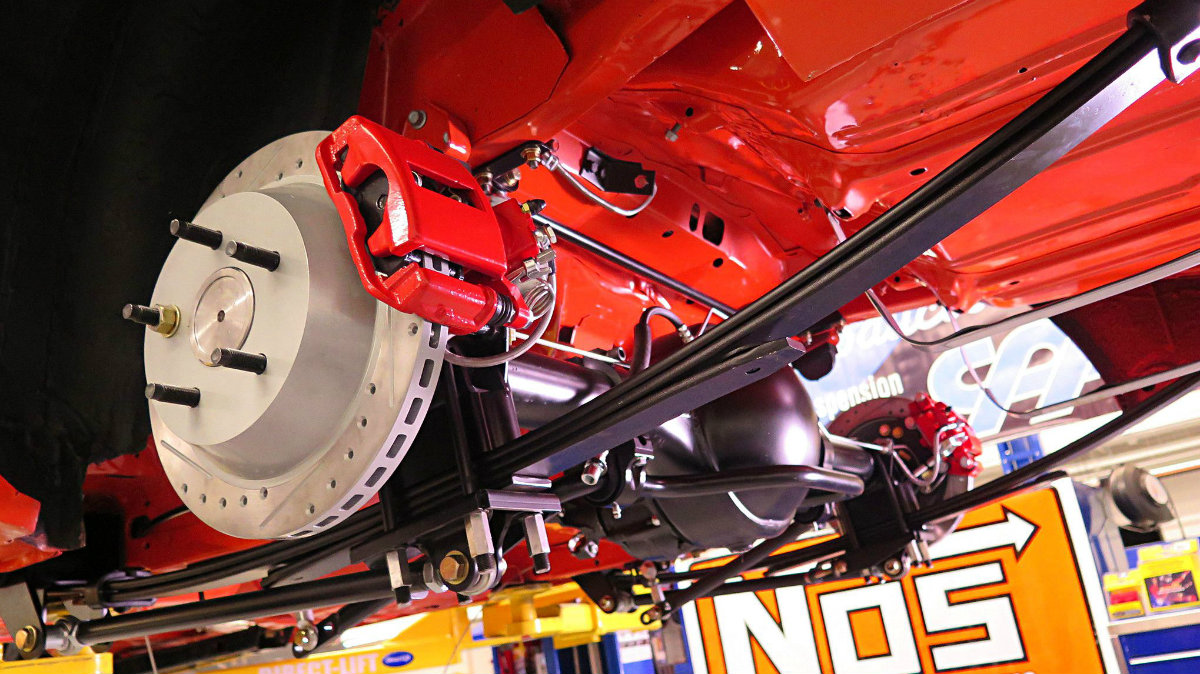
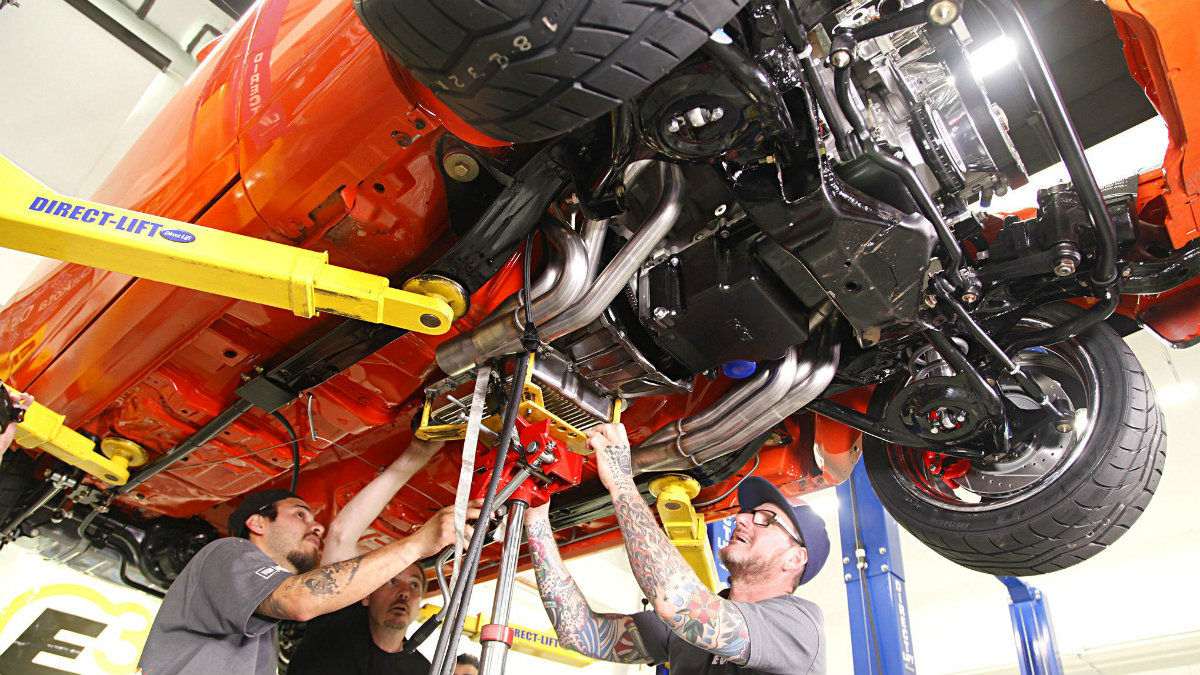
8. To replace the old 10-bolt peg-leg rear, CPP supplied a complete 9-inch rear filled with 3.70 gears and a Detroit Truetrac posi. The rear came with the 12-inch disc brake system already installed, which was a real time saver. You can also spy CPP’s narrow leaf springs. When combined with their shackle kit, the system will give us just enough room for the 315mm rear tires.
9. Using CPPs kit, the rear shocks were moved inboard of the framerails for more tire clearance and were set up to no longer be staggered. The double-adjustable billet shocks will let us easily tune for different driving events. The front system received double-adjustable coilovers to give us a ton of tuning options.
10. By the end of Day 1, we had the Camaro stripped down and all of the CPP suspension installed under the car. The front kit included CPP’s tubular control arms and their badass spindles that utilize C7 Corvette sealed bearing hubs, which are quite a bit stronger than the C6 hubs used in many kits. The front 13-inch rotors came slotted, drilled, and zinc washed.
11. Day 2 started with tackling the new EFI fuel system. First up was Holley’s second-gen Camaro gas tank. It came fully baffled with a 255-lph internal fuel pump. The tank itself was silver powdercoated and included straps and the required sending unit.
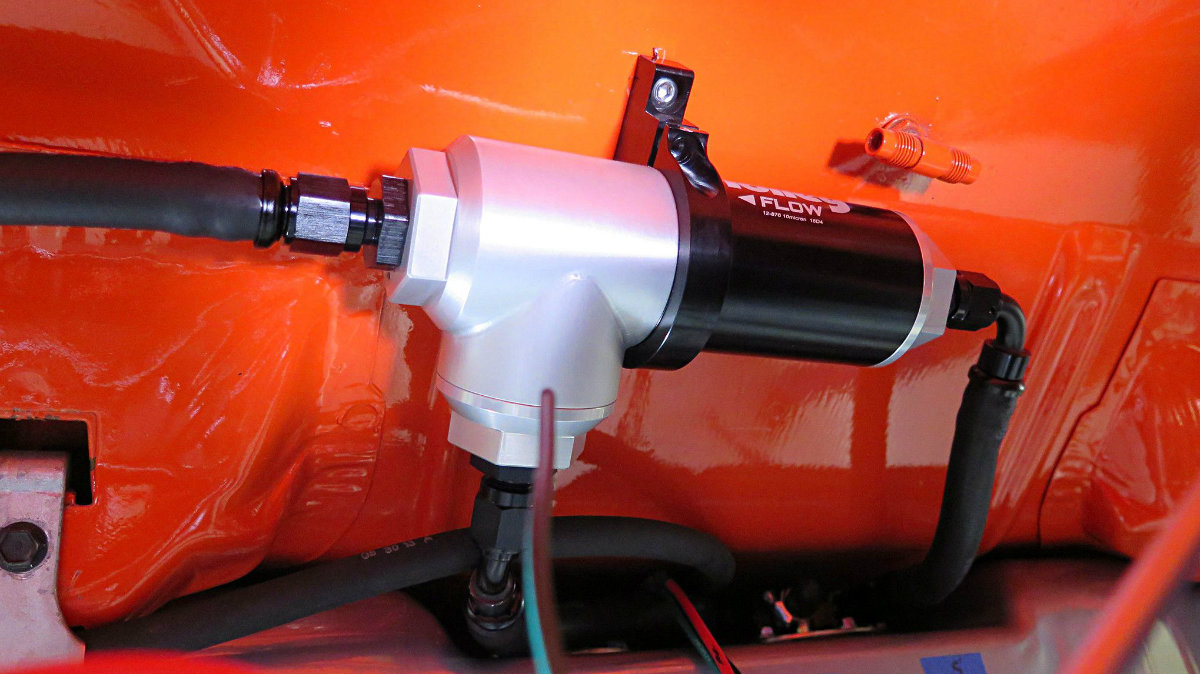
12. The plumbing was made easier with this slick combination fuel filter and regulator from Holley. As implied, the regulator has an integral, fully serviceable fuel filter. This saves space and money since less fittings are needed to plumb it all in. The regulator itself came preset at the required 59.5 psi needed by most LS EFI systems.
13. The crew from CPP also got busy installing and bleeding their Hydra Stop braking system. The Hydra Stop uses fluid pressure from the power steering pump to provide braking assist.
14. CPP also finished up the Camaro’s steering system by installing their 500 steering gear box. The box features a 14.7:1 ratio that’s fast for quick maneuvers, but not so fast that it feels twitchy cruising down the highway.
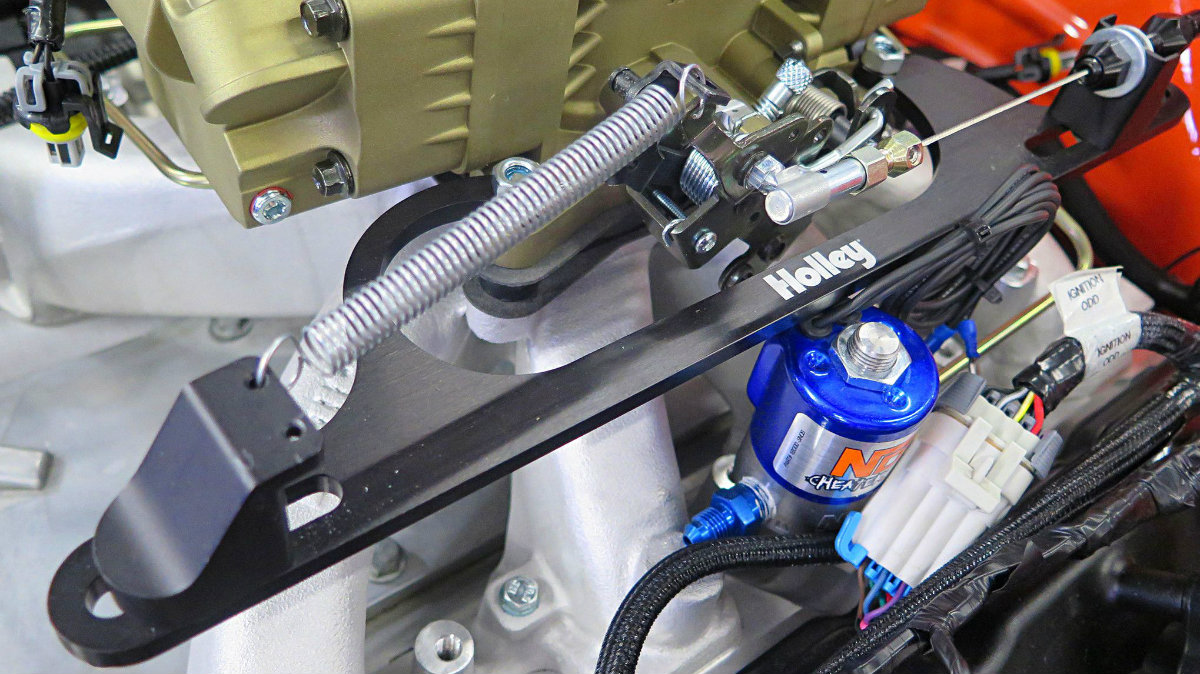
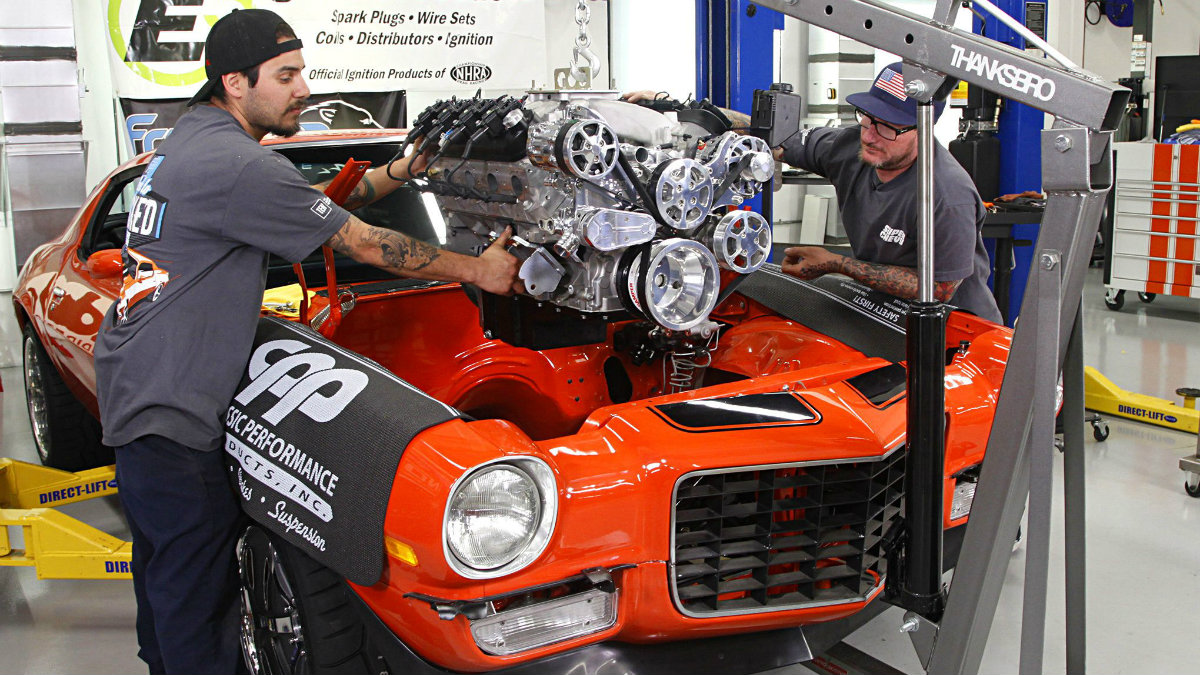
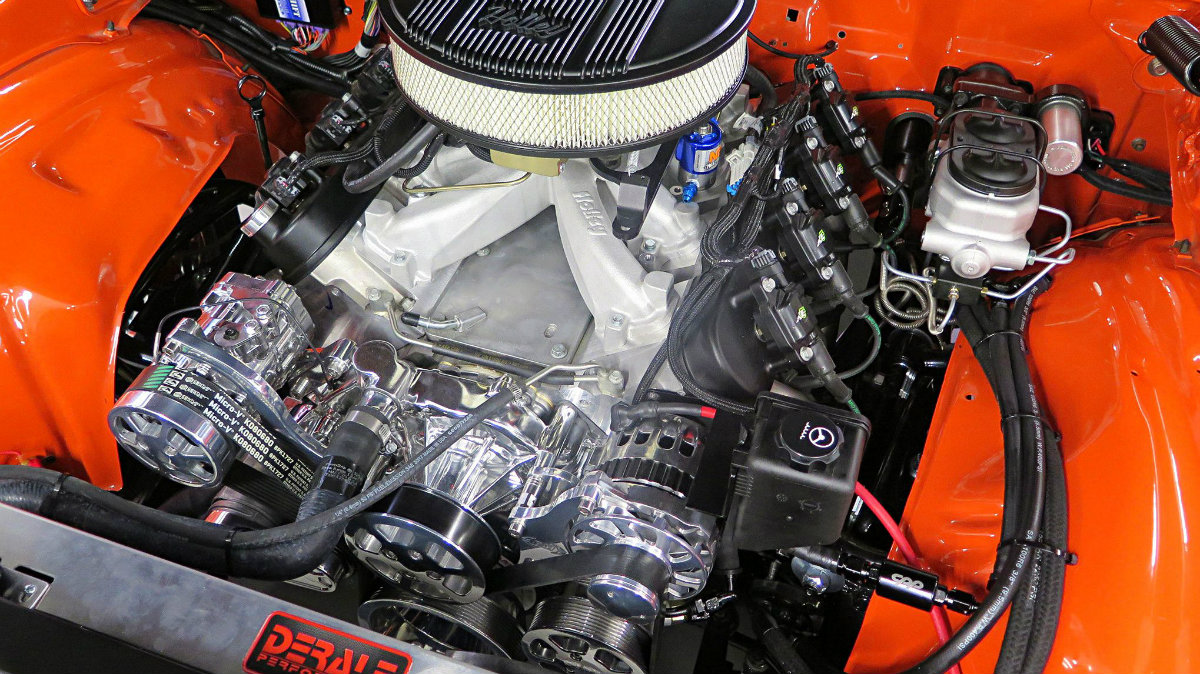
15. The engine was sent to us via Scoggin-Dickey Parts Center (SDPC) and is a Chevrolet Performance LS376/515 crate engine. Rated at over 530 hp, it already had a healthy GM cam so we only needed to add a Holley single-plane intake, Holley LS swap oil pan, and their matching valve covers. For ignition we had a trifecta of products from E3, including spark plugs, wires, and their brand-new LS coil packs. Free-flowing Hooker 1 7/8-inch LS swap headers will expel the gases and topping off the engine is Holley’s Terminator Stealth EFI system. Made to look like a traditional carburetor, the Terminator is a self-learning EFI system that will give our LS a unique look.
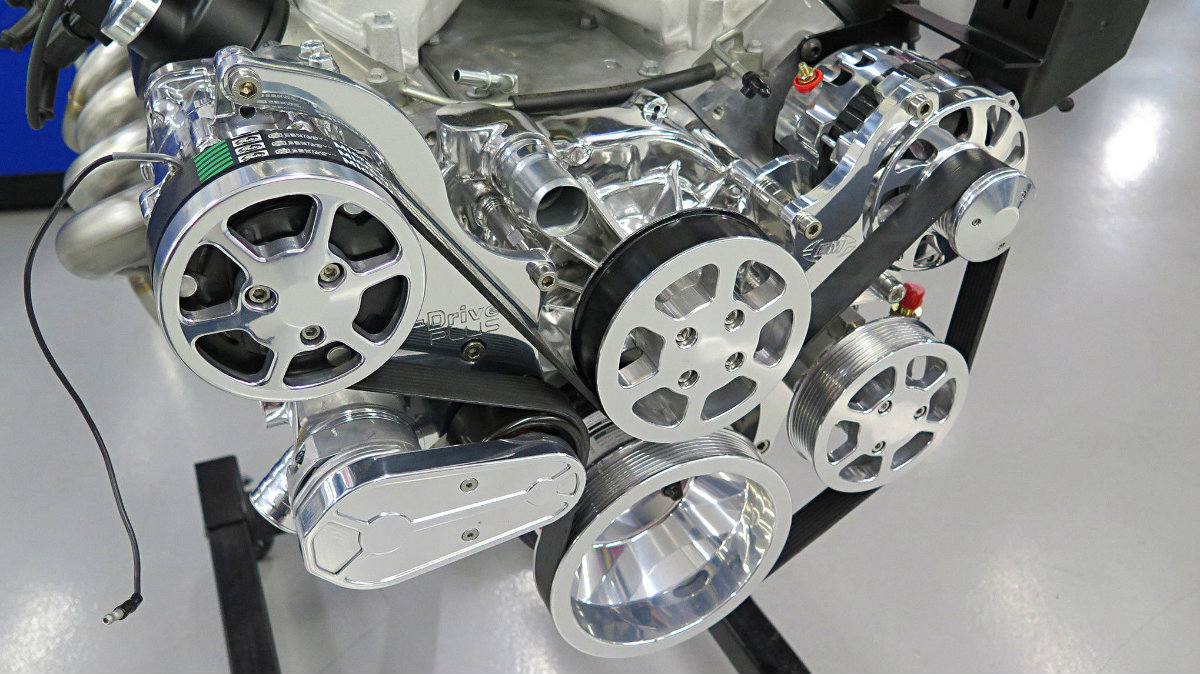
16. We then bolted on Eddie Motorsports S-Drive Plus drive system. The parts came fully polished and clearcoated so that it will stay looking good with little effort. We like this system since it includes brand-name accessories like the Powermaster 140-amp alternator, Tuff Stuff water pump, Sanden A/C compressor, Maval power steering pump, GM heavy-duty tensioner, and Gates belt. The S-Drive Plus also incorporates an eight-rib drive belt that can hold 33 percent more power than a six-rib belt.
17. Next up was bolting the Holley LS engine mount plates to the LS block. The Holley LS swap parts, when used together, ensure that the headers clear properly and that the right driveline angle is achieved.
18. The Holley engine mount plates were designed to work with the second-gen Camaro’s clamshell-style engine mounts. We ditched the squishy rubber bushings in the mounts and replaced them with Energy Suspension polyurethane pieces.
19. Before lunch on Day 2, we dropped the new SDPC Chevrolet Performance LS crate engine into the Camaro, which gave us the warm, fuzzy feeling that we were ahead of the game. Before the build we dyno-tested the engine at Westech Performance and it churned out 540 hp NA and 660 hp with a nitrous hit.
20. Next up, we were able to install the transmission cooler from Performance Automatic on the front of the core support using some standoffs that Jason knocked out in our fab room.
21. We were then able to slide the Hooker Blackheart stainless long-tubes into place, from the bottom, and begin bolting them to the LS376.
22. As the sun was setting on Day 2 we were installing the Holley Frostbite three-row, dual pass LS swap radiator. This piece came ready to go with both the inlet and outlet built on the passenger side and provisions for the LS head steam port plumbing. To move tons of air we added a Derale shroud and twin-fan kit to the mix.
23. The rollers showed up, so we quickly got them on the Camaro so it could get off the lift if needed. The wheels are American Legend Talon two-piece billet pieces. The two-piece offering is a great compromise between pressure cast wheels and the more expensive three-piece designs. Wrapped around these wheels are the new Falken RT615K+ tires. These high-performance street/track tires feature a revised tread compound that gives a ton more grip but still retains the 200 treadwear rating. The fronts are 275/25R18 while the rears came in at 315/30R18.
24. As darkness fell, we readied the Performance Automatic PAGM Street Smart 4L70E four-speed overdrive transmission for its installation. The 4L70E came fully upgraded with improved clutches, a modified valvebody, and other upgrades to play well with our LS376 engine. In fact, it was specifically designed to work with our LS376/515 crate engine.
25. With the day winding down, we lifted the Performance Automatic 4L70E into place and bolted it in using the Holley LS swap transmission brace and an Energy Suspension poly trans mount. We called Day 2 a wrap since we were pretty happy with what we had done in the first two days of the week.
26. First thing in the morning we installed the fresh-off-the-balancer 3.5-inch aluminum driveshaft from Inland Empire Driveline and started hanging the Hooker Blackheart stainless 2.5-inch exhaust system using the Hooker adapters to step up to the 3-inch collectors on our headers.
27. Early on Day 3 this is where we were at. It looks nearly done with the wheels and driveline installed, but in reality there was a ton left to do; namely wiring.
28. Remember that awful fiberglass hood we mentioned? Well, to replace it, Golden Star sent us over a 2-inch cowl steel hood, but since the Camaro had been built for the sketchy ’glass hood, the new steel hood didn’t fit great. To make matters worse we didn’t find out until a few days before the build was to start. Luckily, the guys at Best of Show Coachworks in Escondido, California, offered to make the new hood fit the car and spray it in a matching shade of Hugger Orange. In fact, when it showed up on Day 3 it had just come out of the spray booth and was still tacky so color sanding and buffing would have to wait. After we confirmed the hood fit, it was removed to make working on the Camaro’s wiring easier.
29. Wiring doesn’t get the respect it deserves. Maybe because it’s hidden away out of sight, but in reality it’s one of the most important aspects of a build. If you’re shopping for car a quick peek under the dash, at the wiring, can quickly tell you how much care was put into the build. To make sure our new wiring was done right, Jeff Abbott, of Painless Performance, helmed the project. Even though we started with their direct-fit kit there was still a lot of work ahead since it had to be interfaced with the Dakota Digital dash, Holley EFI ECU, and Performance Automatic transmission Street Smart controller.
30. Speaking of ECUs, we mounted the Holley and Performance Automatic computers to the Camaro’s flat firewall. Both units are weathertight so this was the best option. You can also see our rather attractive black transmission dipstick from Lokar.
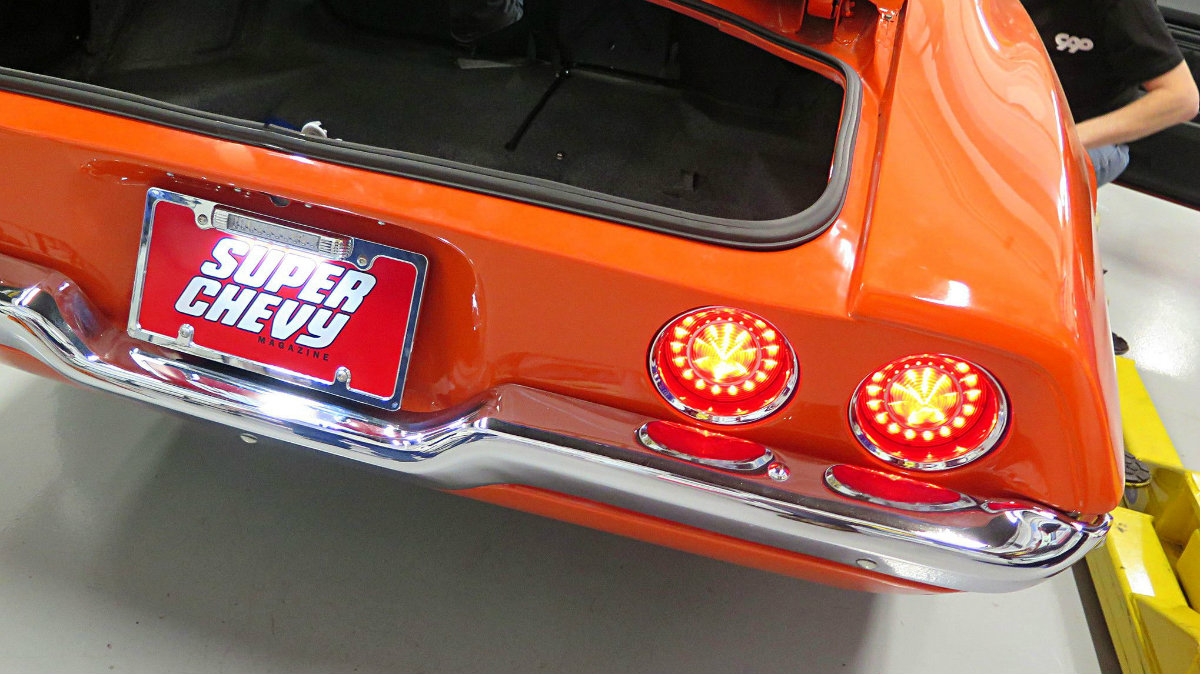
31. The guys from United Pacific also stopped by with a complete LED lighting kit for our Camaro. We opted to ditch the backup lights in the taillights and have two pairs of brake lights with an attention-grabbing sequential module. To make up for losing the reverse lights we added a very cool license plate, also from United Pacific, which incorporated a plate light and very bright LED reverse lights. Day 3 and most of Day 4 were spent wiring up the Camaro.
32. Moving to the interior, we installed the ididit tilt steering column. It fit just like the factory column and had all the bells and whistles like hazard flasher, auto-cancelling turn signals, horn relay, and an ignition key on the column. Later, we completed it with a steering wheel from Eddie Motorsports.
33. With the column installed we could slide in the new Dakota Digital HDX gauge cluster. The new HDX line is pretty sweet in that it can be configured in a host of different colors either on the dash itself or by way of a smartphone, app, and Bluetooth connection! The HDX utilizes the stock OE bezel for a factory, yet upgraded, look.
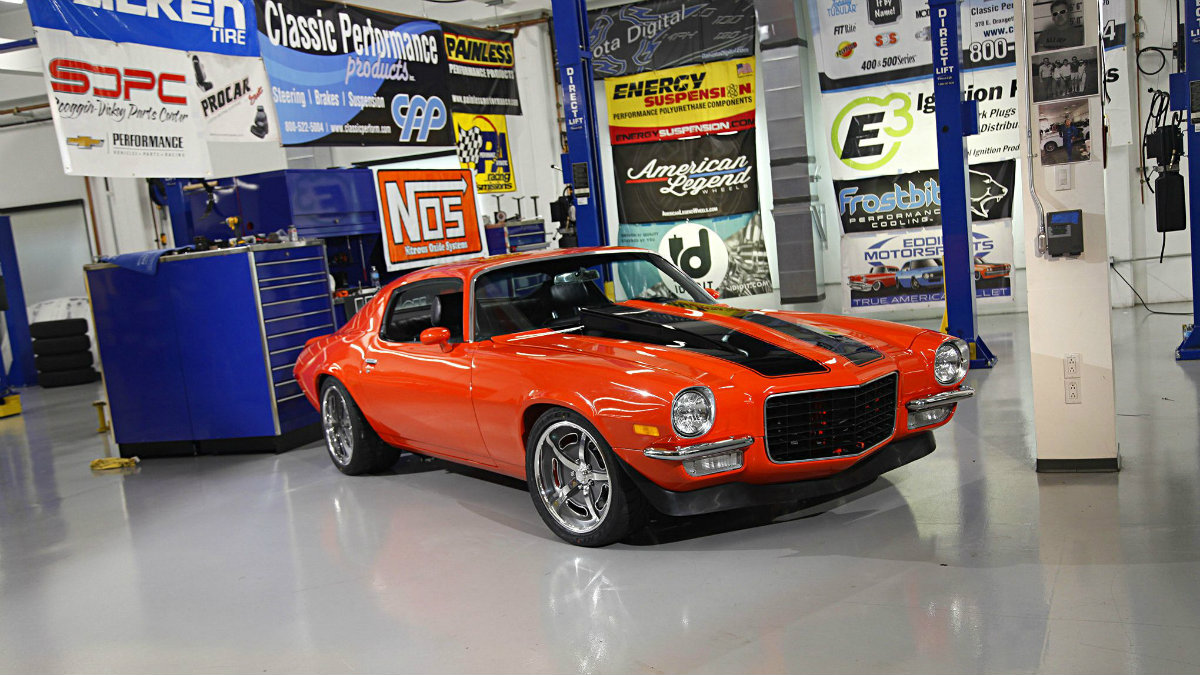
34. We plan on lots of hard turns when we debut this ride at the Holley LS Fest West, so for seats we went with a pair of Procar by Scat Rally Smoothbacks. They have a classic look but incorporate aggressive side bolsters that will keep us anchored in place. We chose black, but they come in many colors and Procar even offers custom colors, stitching, and piping.
35. This beautiful gas pedal assembly came from Clayton Machine Works and is almost too nice to stomp on, but we will. The kit also came with a matching brake pedal pad.
36. The throttle cable from the Clayton Machine Works pedal was run to the Holley Terminator and hooked up just like any carburetor would be. You can also spot the nitrous solenoid for our NOS Cheater system. Why? Because a little more power is almost just enough.
37. We’ve done enough of these builds that we have a pretty good idea of what radiator hoses will work with minimal modifications. We also dropped in the Optima YellowTop battery and finished up the wiring, including the rather large, 240-amp, braided ground strap from Painless Performance.
38. Late afternoon on Friday, Day 5 (well, Day 6 if you count the wheeltub day) and the car was together, filled with fluids, and ready to fire for the first time. Cameras were rolling, and our very own John Gilbert was covering the moment on Facebook Live. The key was turned, the engine spun over, and fired right up. We let it run for a bit and started checking for the inevitable leaks. In this shot you can also see how much better the split bumpers look (sourced from Classic Industries) compared to the one piece bumper and you can spot our new Halogen headlights from United Pacific.
39. Here’s our engine bay done and ready to roll. To be honest, we thought that the NOS nitrous plate, combined with the carb-style air cleaner would keep the hood from closing, but, as luck would have it the air cleaner lined up perfectly with the hole in the cowl-induction hood and cleared, just barely. We still have a date with the chassis dyno at Westech to finish the nitrous kit and make sure the system is set up to pull timing when it senses a 12v signal from the NOS kit, but we’re confident the 540 hp from the SDPC Chevrolet Performance crate engine will tide us over till then.
40. It was almost 5 p.m. on Friday when we considered the Camaro done enough for a trip out into our parking lot. Of course, we battled a tiny brake fluid leak and couple of other small gremlins, but after some tinkering and tweaking the Camaro was a running, driving car again. Of course, we think it looks way better than where it started.
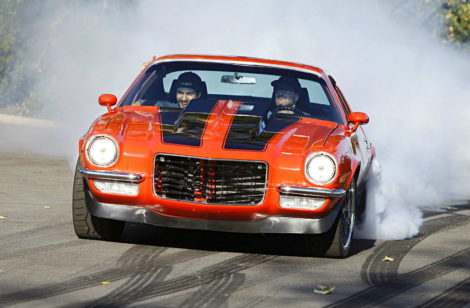
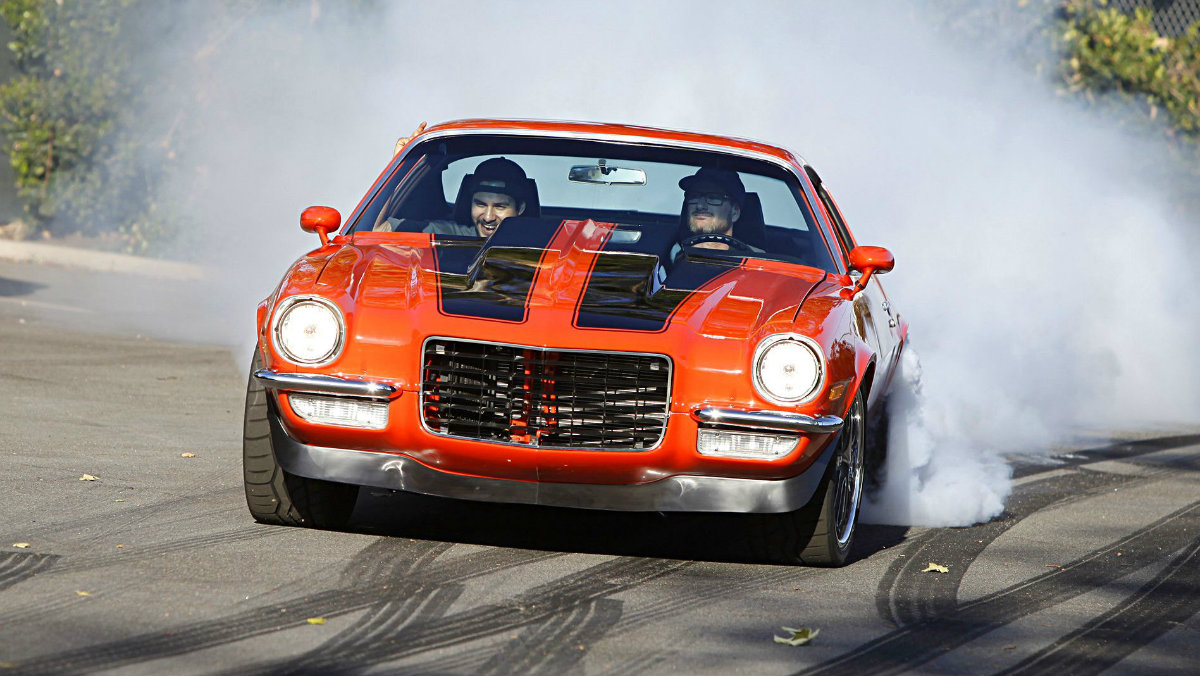
41. Burnouts, burnouts, and more burnouts. Most likely not the best way to break in a bunch of fresh parts, but after so many hours putting the car together we just couldn’t resist. Now we just need to figure out how to get our personal projects done this quickly!
More on our Week to Wicked 1972 Camaro Build!
Week To Wicked 1972 Camaro Build!
Week To Wicked 1972 Camaro: Monday, Day 1
Week To Wicked 1972 Camaro: Day 1, CPP Install and Build Gallery
Week To Wicked 1972 Camaro Day 2: Chassis Wrap Up and Driveline Prep!
Week To Wicked Day 2: Getting the Drivetrain into our 1972 Camaro
Week To Wicked Day 3: Plumbing, Wiring, and Making Progress on Our 1972 Camaro
Week To Wicked Day 4: Moving Closer to Finishing Our 1972 Camaro
Week To Wicked Day 5: Finishing up and Firing up our week long project, complete with smoky burnouts!
Week To Wicked 1972 Camaro Pro Touring Build from Start to Finish!
Photography by the Author and Nick Licata