Mark Gruss 56 F100
FollowVehicle Quick Facts
Profile ID: 45750
Year: 1956
Make: Ford
Model: F-100 Pickup
Markets: Resto-Mod, Truck
Vehicle Type: American
Contact: Hot Rod Institute
![]()

Vehicle Story
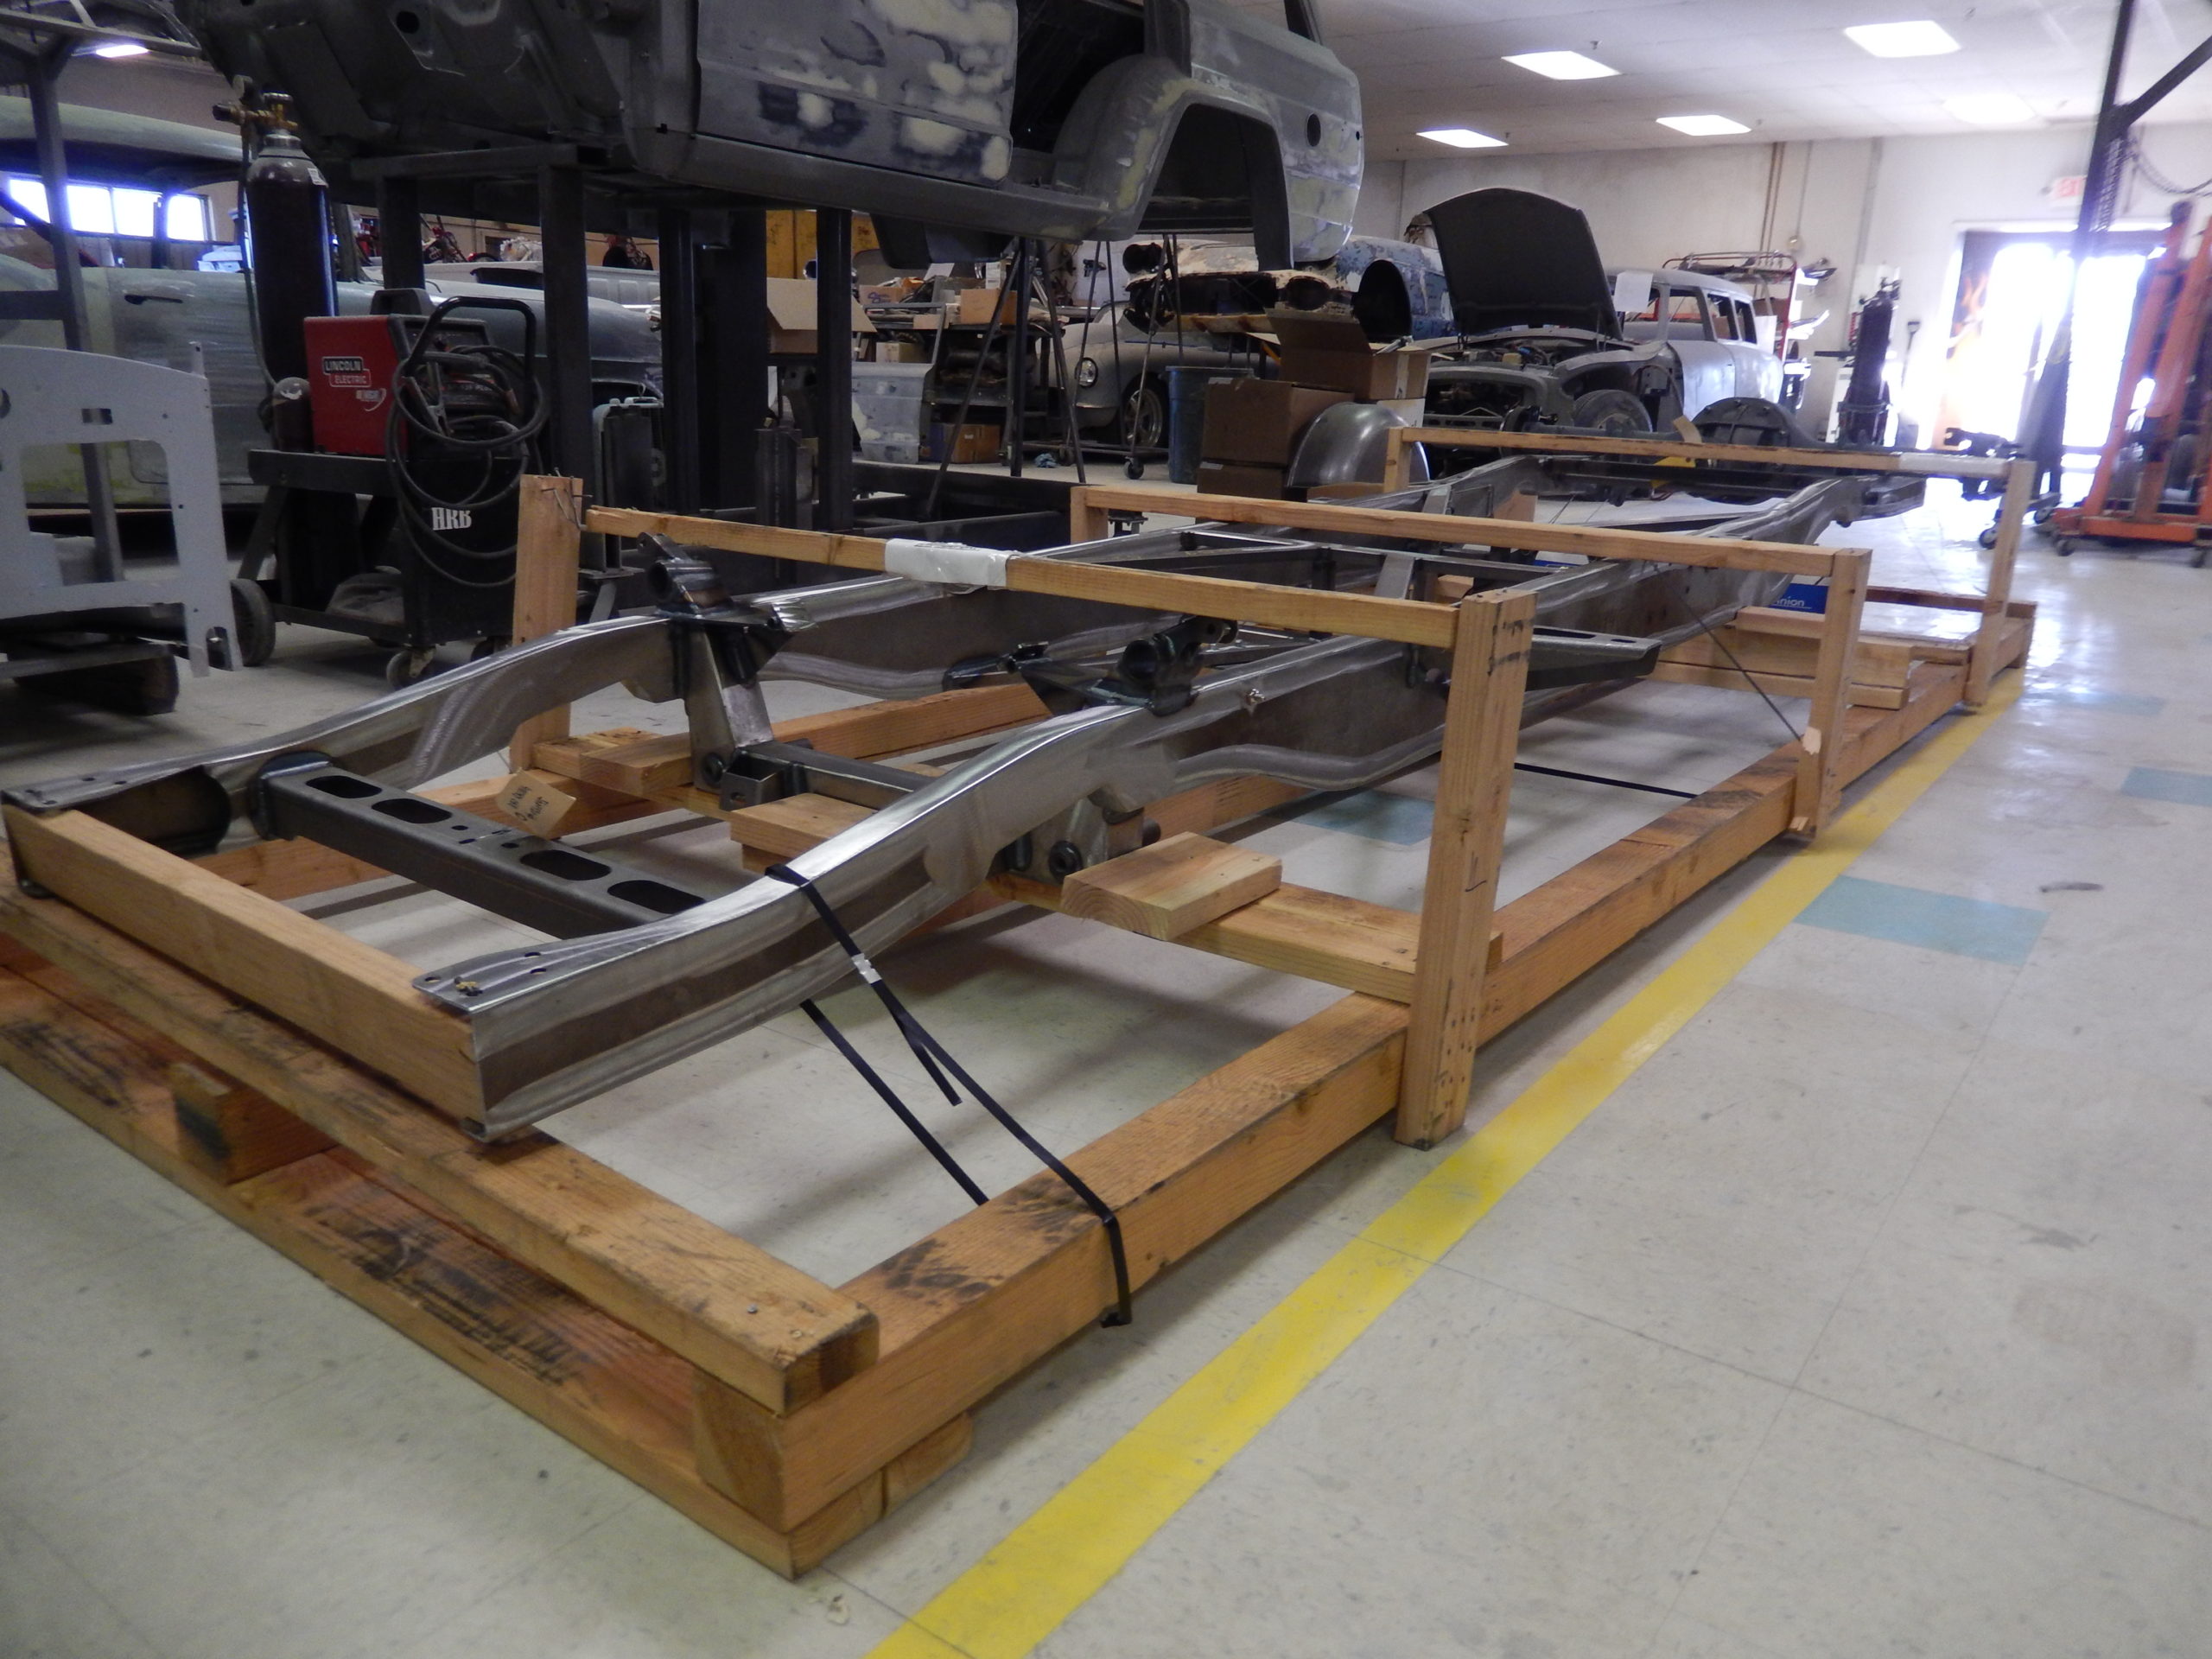
The chassis came from Total Cost Involved (TCI). We called TCI up and asked for the best riding and handling chassis they had. We talked to a guy there that had a F100 and drove it from California to Kentucky with his wife and he said she enjoyed the ride, very smooth. So that is the chassis we went with. The Chassis can complete less assembly. Front suspension, four bar rear suspension with a 9-inch ford rear (3:70 posi rear gear ratio). 12-inch Wilwood breaks all the way around. Ride Tech coilover shocks, ride awesome. All the breaks were plumbed, master cylinder mounted on the frame with buster. Very nice and complete chassis with some assembly required. Frame came with all the sway bars, front and rear. The Chassis was bought through Alan at BAD racing in Black Hawk SD.
The rear wheels we got from American Legends. Up front we use 8 x 18 and the rear wheels are 10 x 19. The tires are from Pirelli the P-Zero was used. The size of the front tires is 235/50R 18 and the rear is 295/45R 19. All purchased through our local dealer Alan at BAD Racing in Black Hawk SD. Alan was able to call the American Legend and they did a custom cut and coating on the wheels. The coating help protect and makes the wheels easy to keep clean.
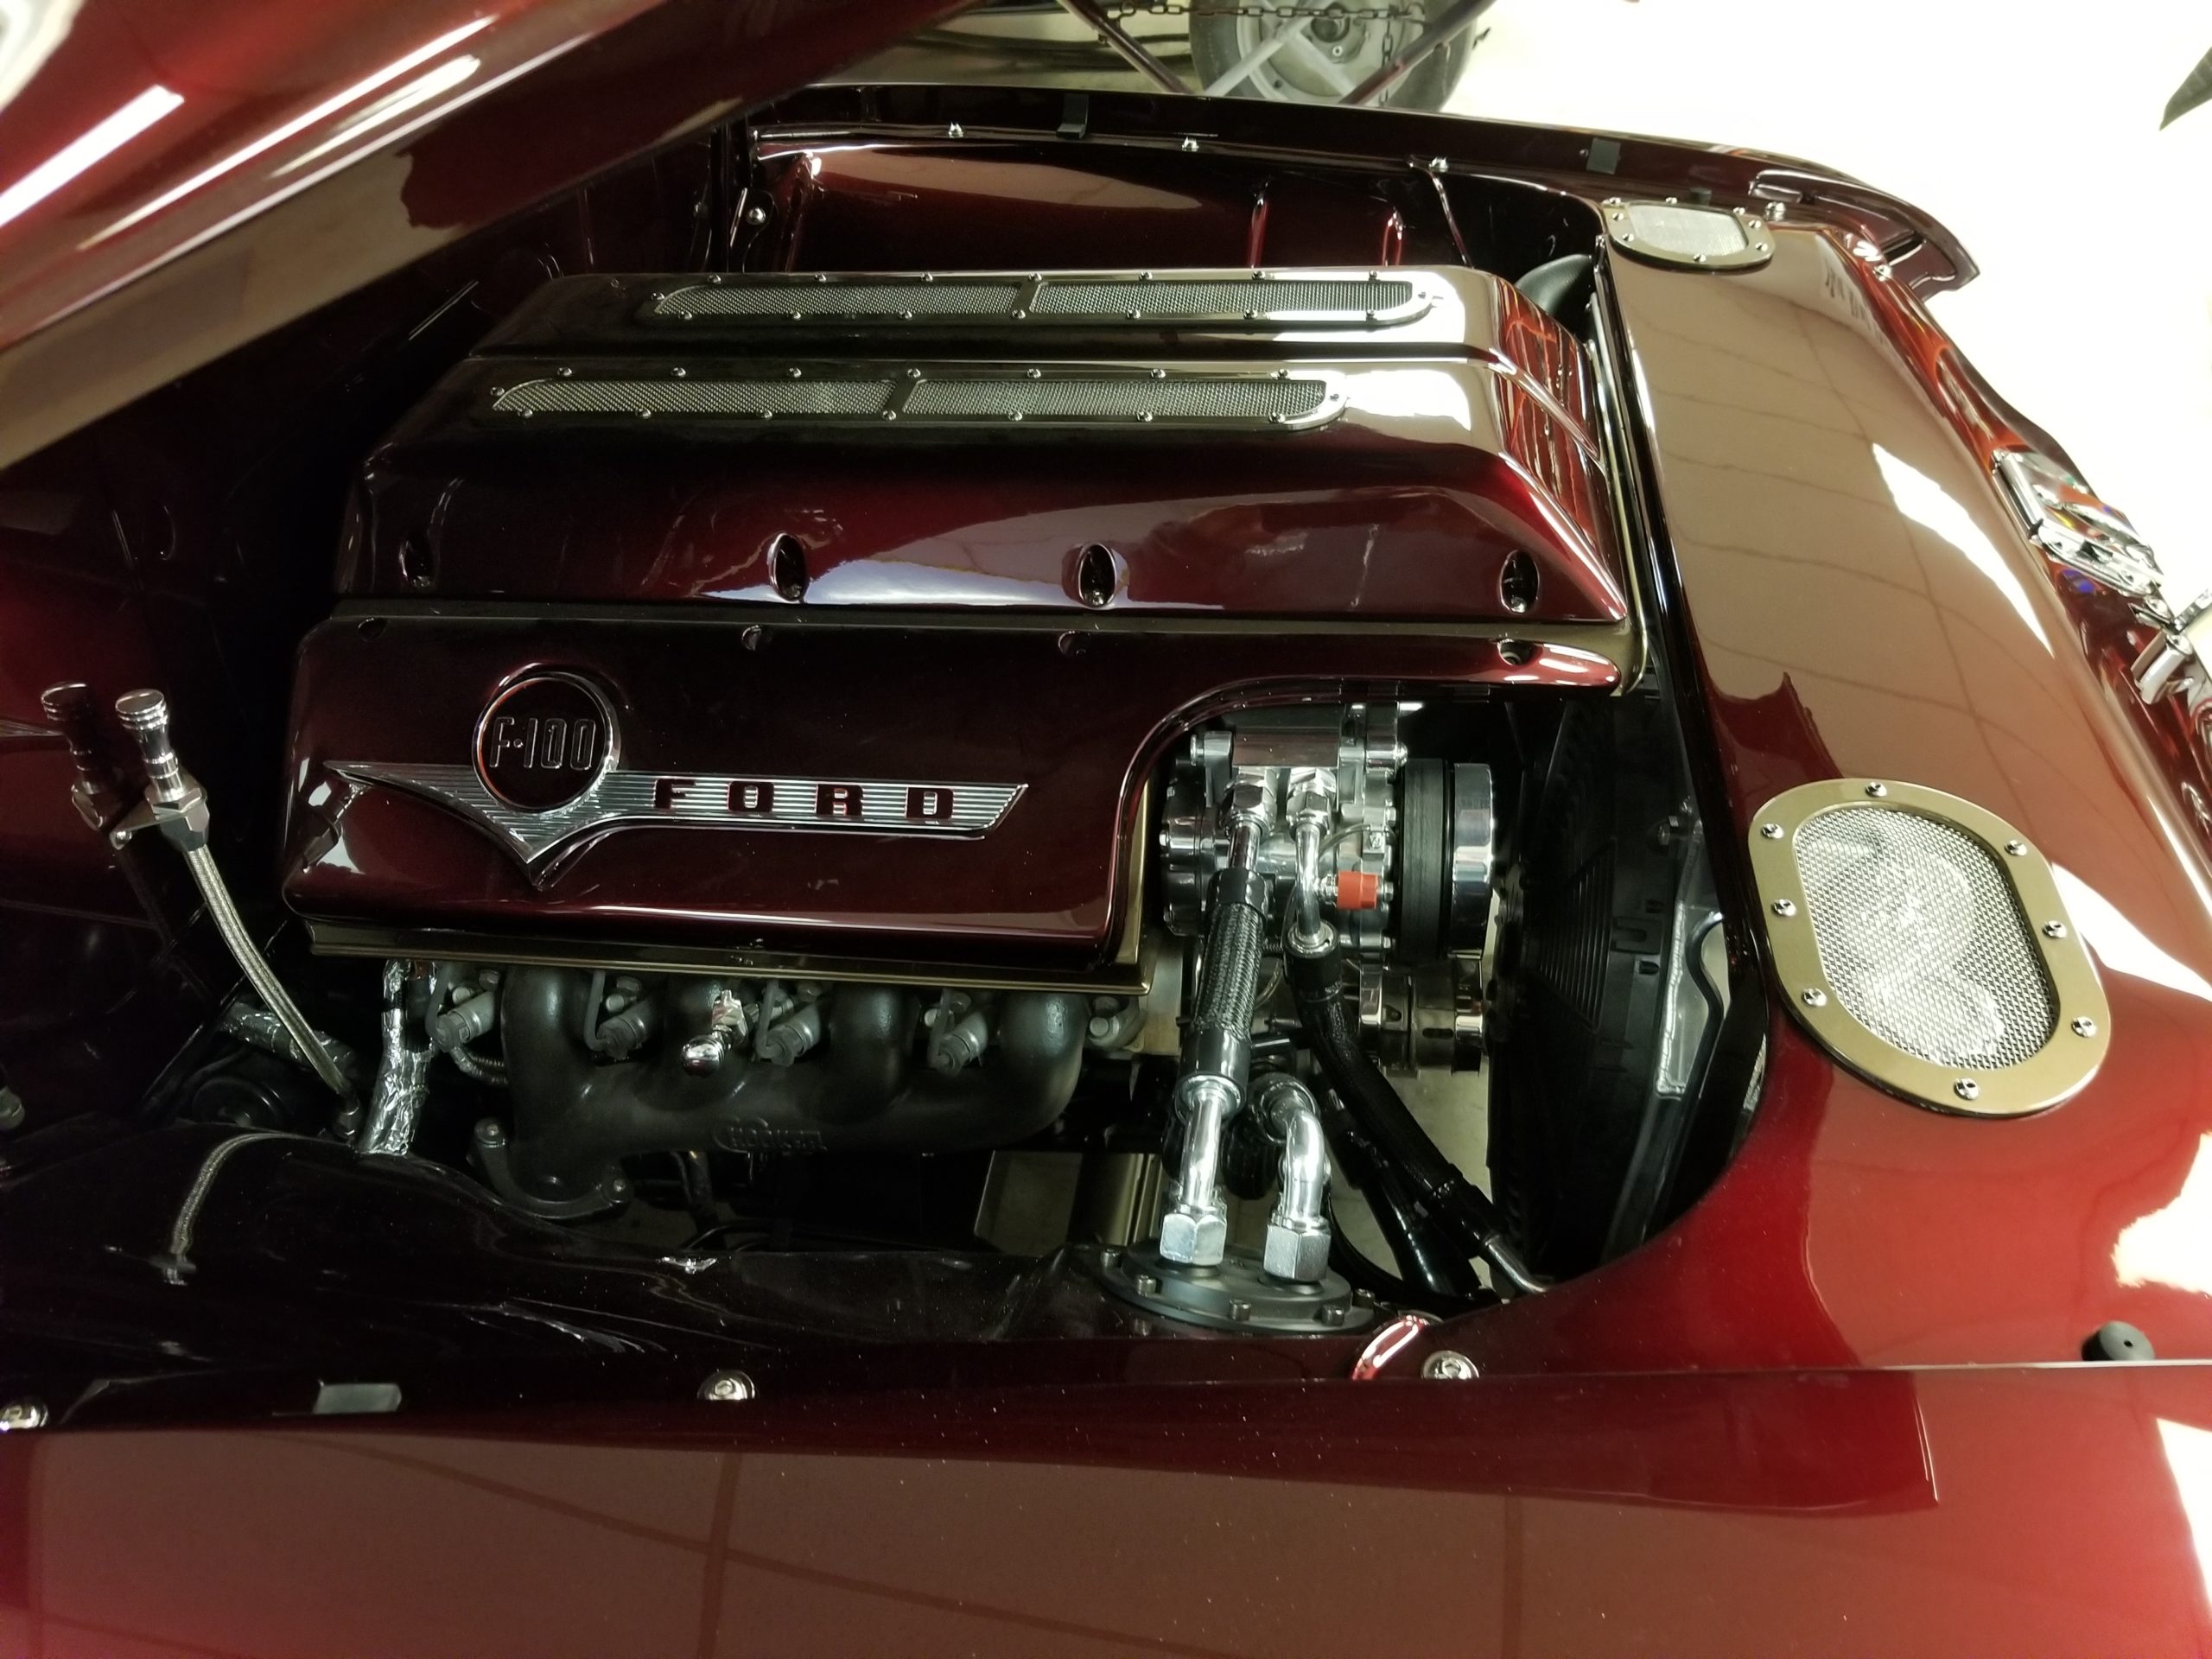
The Engine came straight from GM, it is a 495 hp LS3 crate engine and 4L70E Transmission package. It runs awesome, break the tires loose with no problem. The stock exhaust manifolds were replaced with a set of Hooker cast iron manifolds and of course color coated black to match other accent colors on the engine and wheels. The rest of the Exhaust system was hand fabricated for Stainless tubing. Matt Reed our sheet metal instructor is awesome with stainless exhaust tubing. The TCI chassis doesn’t give a lot of room for exhaust plus Mark wanted to make a little noise with the install of electric cut outs. Matt got everything tucked in the chassis without a rattle. The mufflers we used was Borla, very nice sound, Mark said he wanted to here the engine, but now he says we might have to tone it down a little. We all like the sound, especially with the hot cam the 495 hp LS3 puts out.
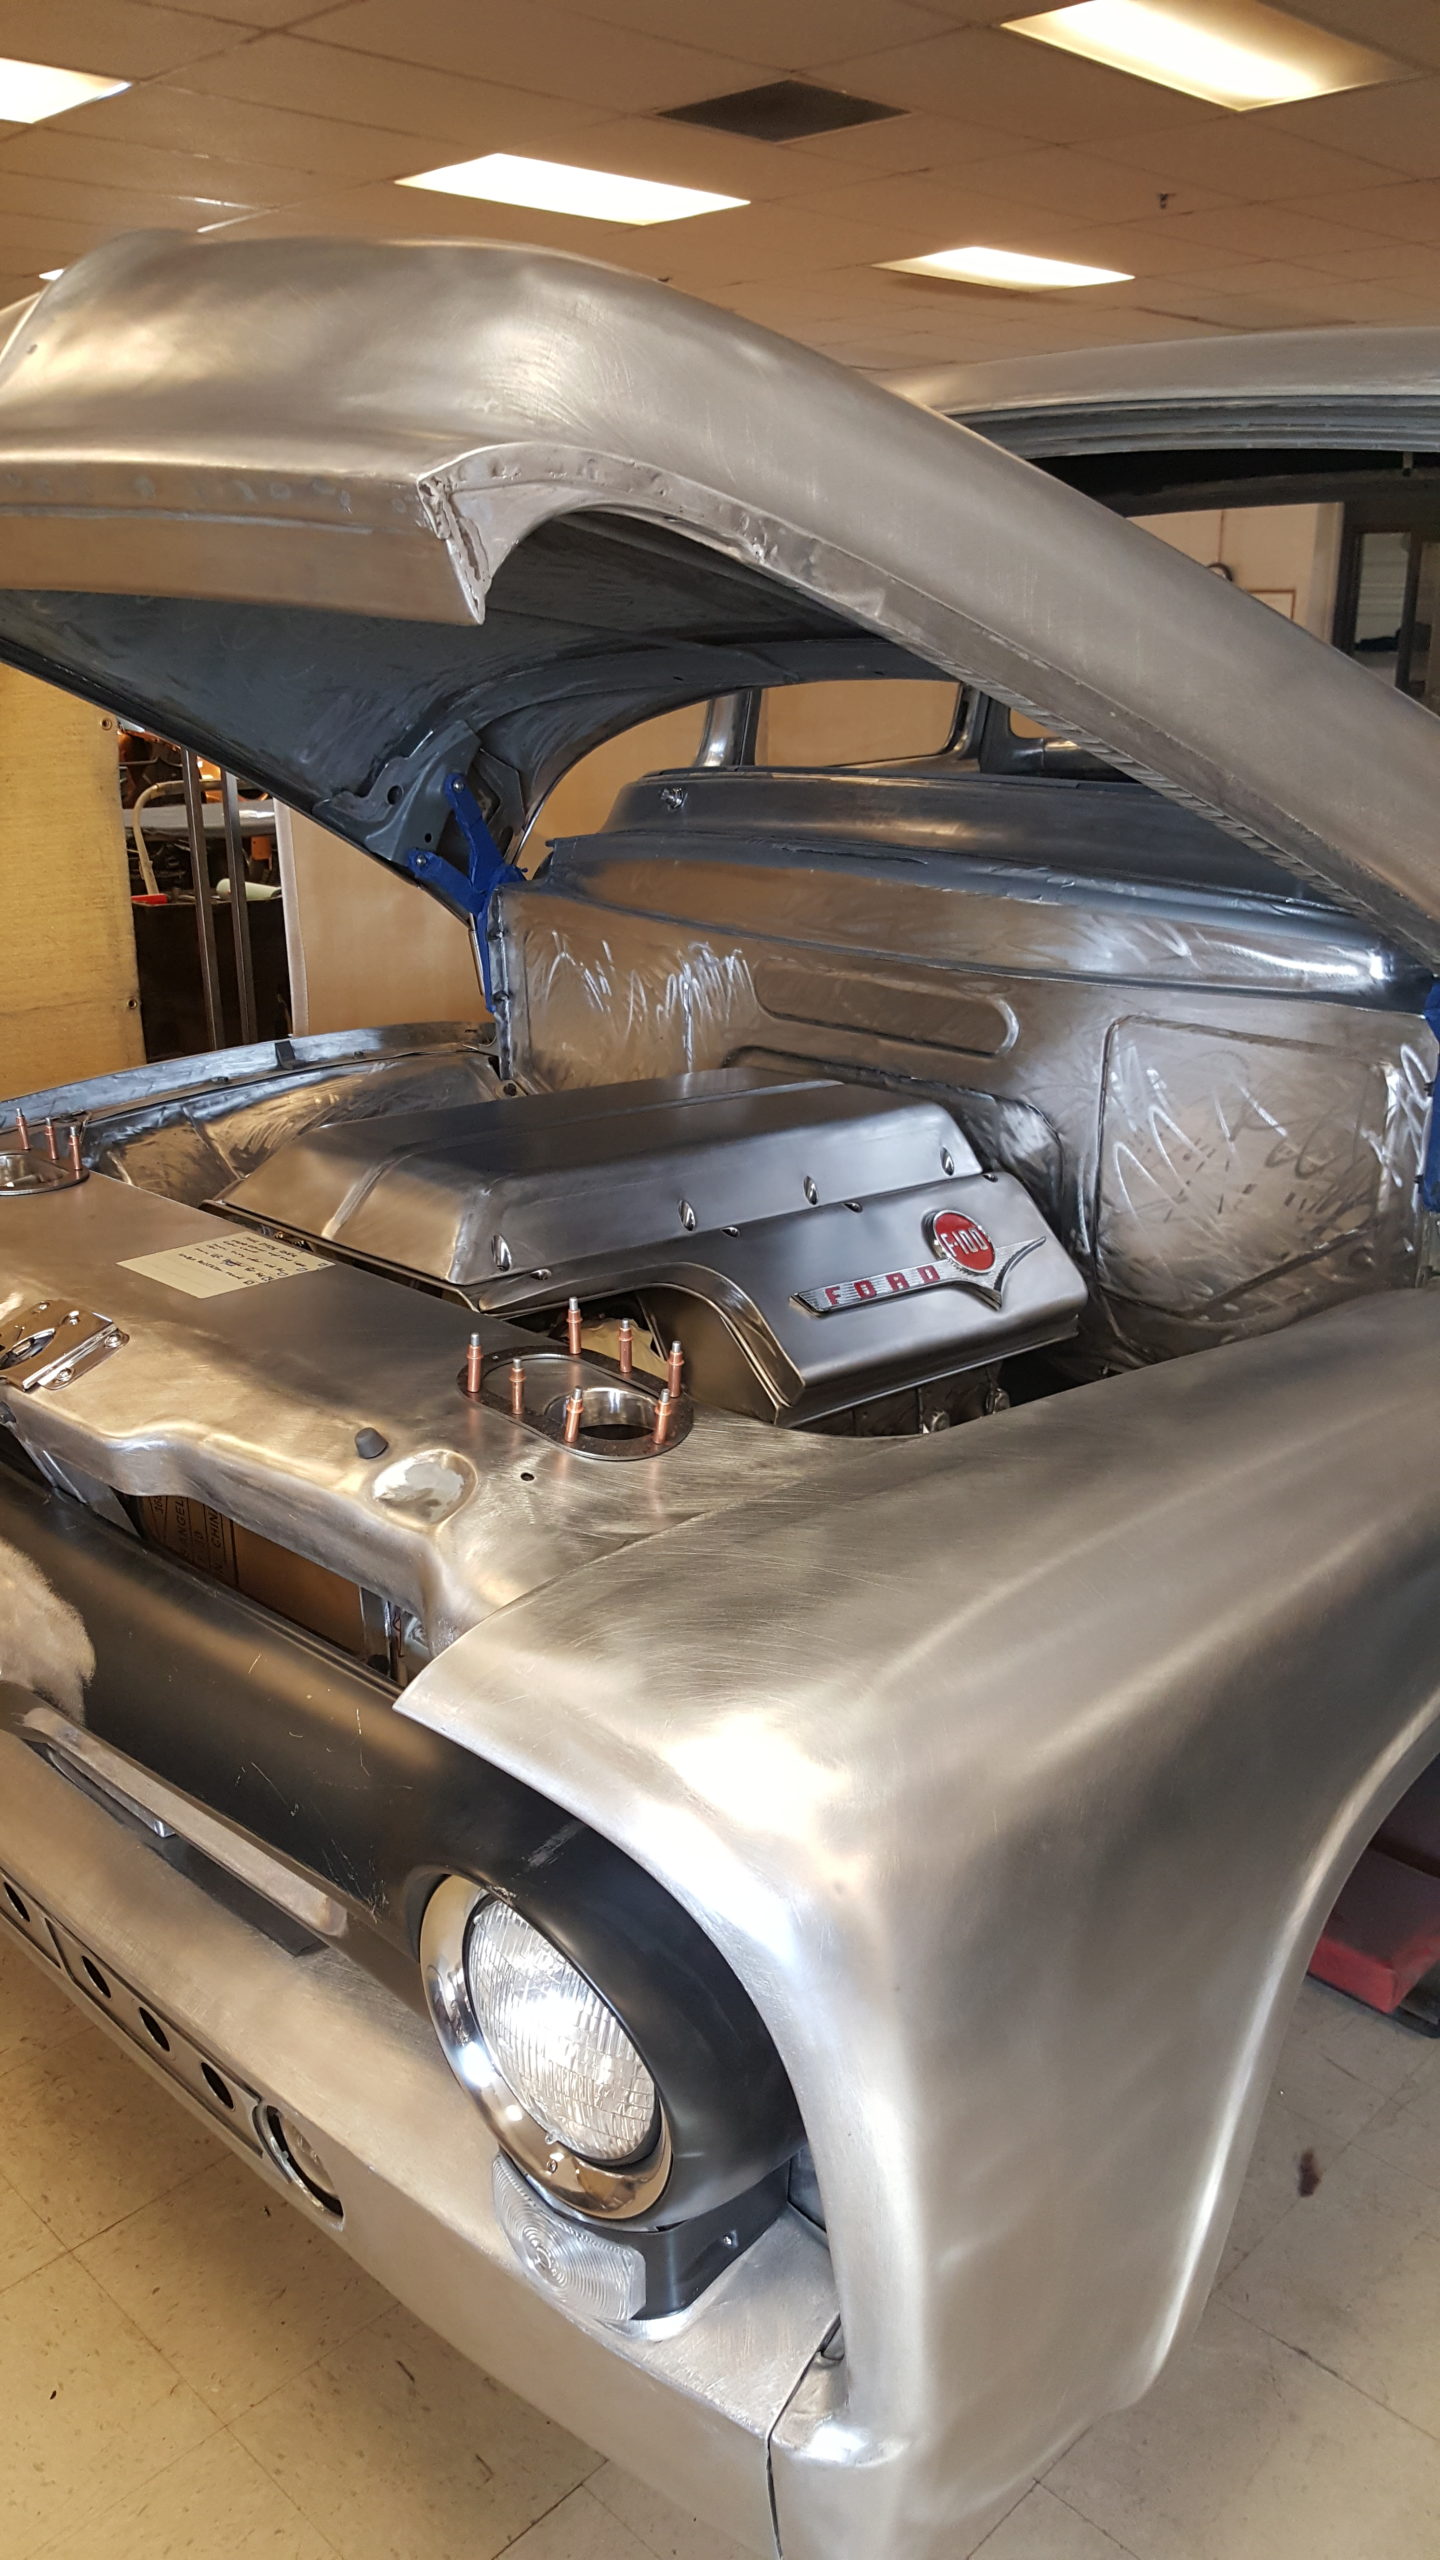
Now under the hood we needed to dress it up and bit by rod shop guy Jason Millard. The LS engine is a great engine, but ugly. Jason started out by cutting the firewall out and fabricating a new smoother one, after all there is no distributor anymore. So new firewall with a little bead rolling action. While we were in there, we decided to get rid of any leaks that may happen in the cowl vent area. Yes, we filled in the cowl vent, no more factory AC. The factory radiator set high and we thought it should sit more level with the fenders. So, we fabricated a smoother radiator support. We bought a wide lower profile aluminum radiator with duel electric fans, no over heating problems here. Keeping the stock inner fender skirts and smoothing them up worked for us. Now install engine, install the front engine runner from All American Billet, polished of course. Now is where we get creative fabricating and engine cover
to hide that ugly LS engine and coil packs. Everything was fabricated from 18-gauge cold rolled steel. We did put a new emblem that should have been on the side of the hood into the cover over the coil packs. It says Ford, so how many people are we going to fool, a lot. Under the engine cover is where the computer box is hiding and there is a K&N air filter under there.
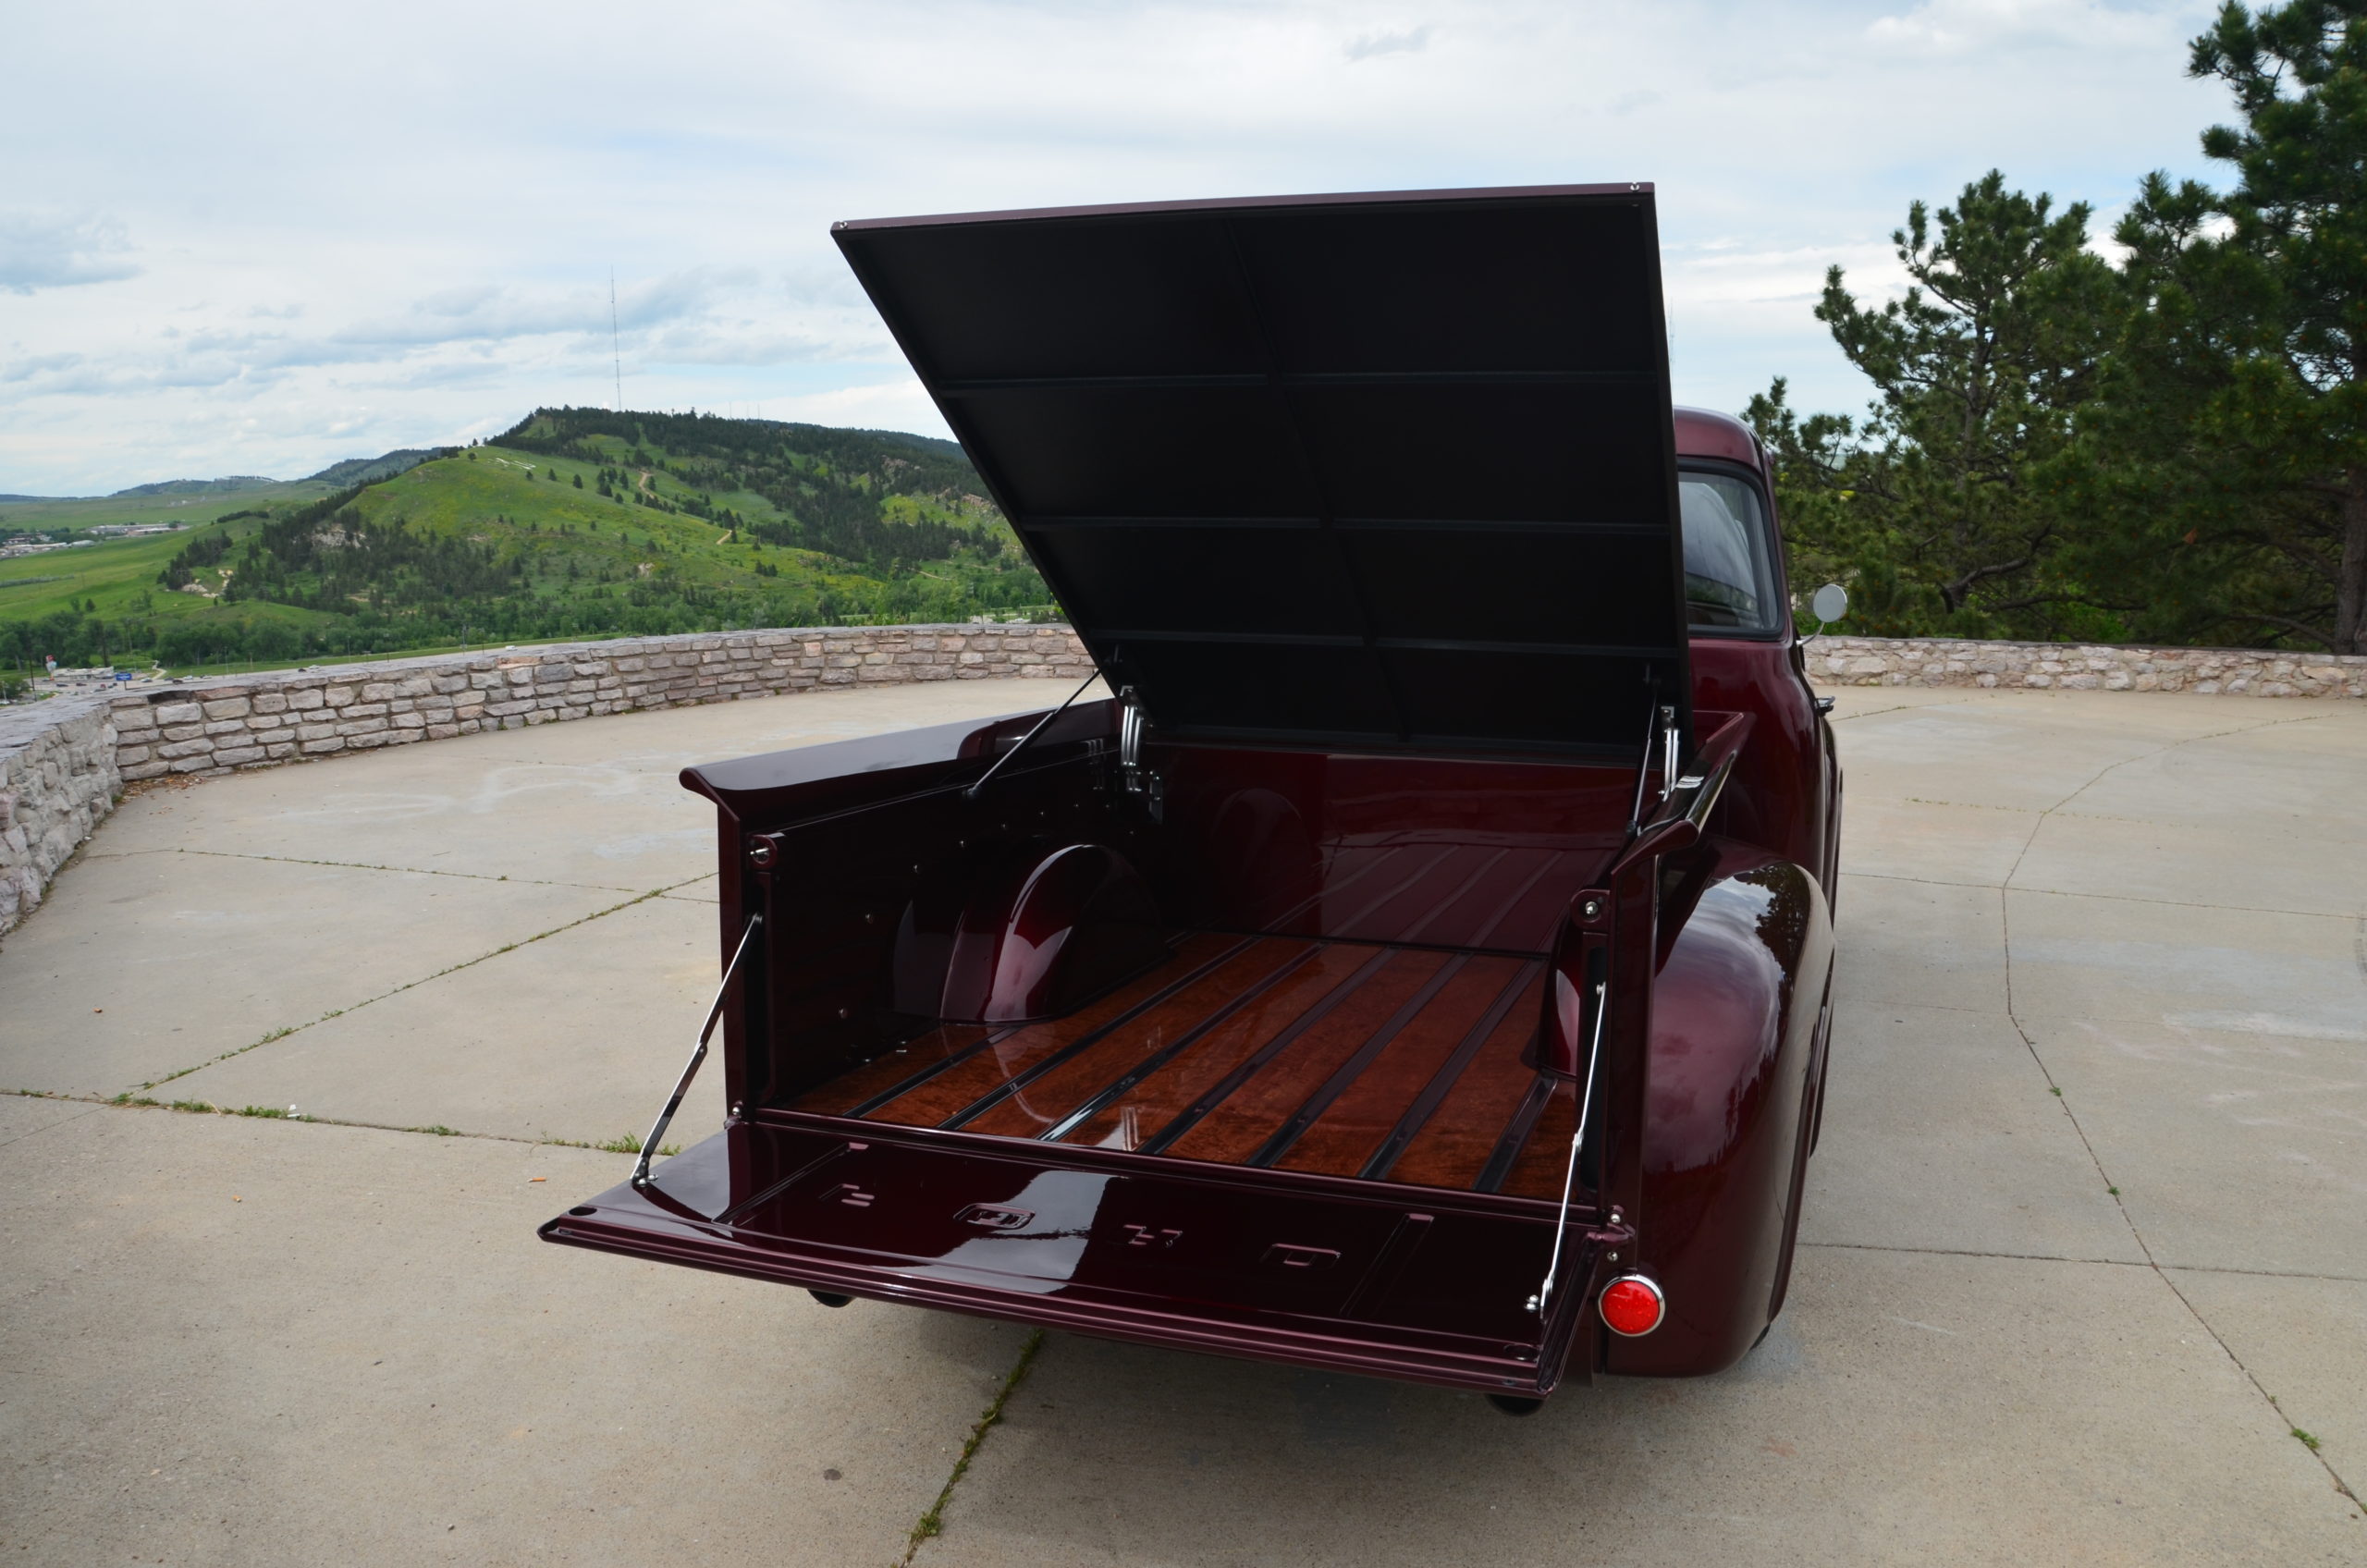
Back to the bed area, we install a pair of small wheel tubs to allow for larger rear wheel tire combination. Of course, that affects the bed wood and stainless strips. The bed wood turned out nice, it’s Birdseye maple. We sanded it very smooth several time, then experimented with the right color stain until we were happy. The wood was stained and clear coated with the same clear we used on the outside paint. We fabricated a box in the front of the bed to house the fuel tank and battery. The fuel tank was fabricated out of .080 Aluminum using a GM fuel pump. While we were in there, we fab up a box to house the Optima red top battery. Because where the battery was hid, we made sure to install some jump post and a power shut off switch. Then a steel cover was fabricated to cover the tank and about the front 12 inches of the bed. We used a Hagen fuel tank door, so the truck is very easy to fill the 16-gallon tank. Marks plan for the truck is take it on the road and drive it. So, we decide to make him a custom-made Aluminum tonneau cover, using aluminum square tubing and .063 aluminum sheet. We went to Sachse Rod Shop in TX for the Tonneau cover hinges and support struts.
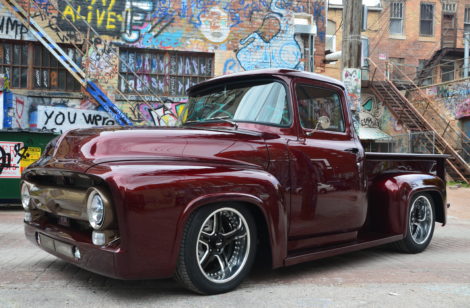
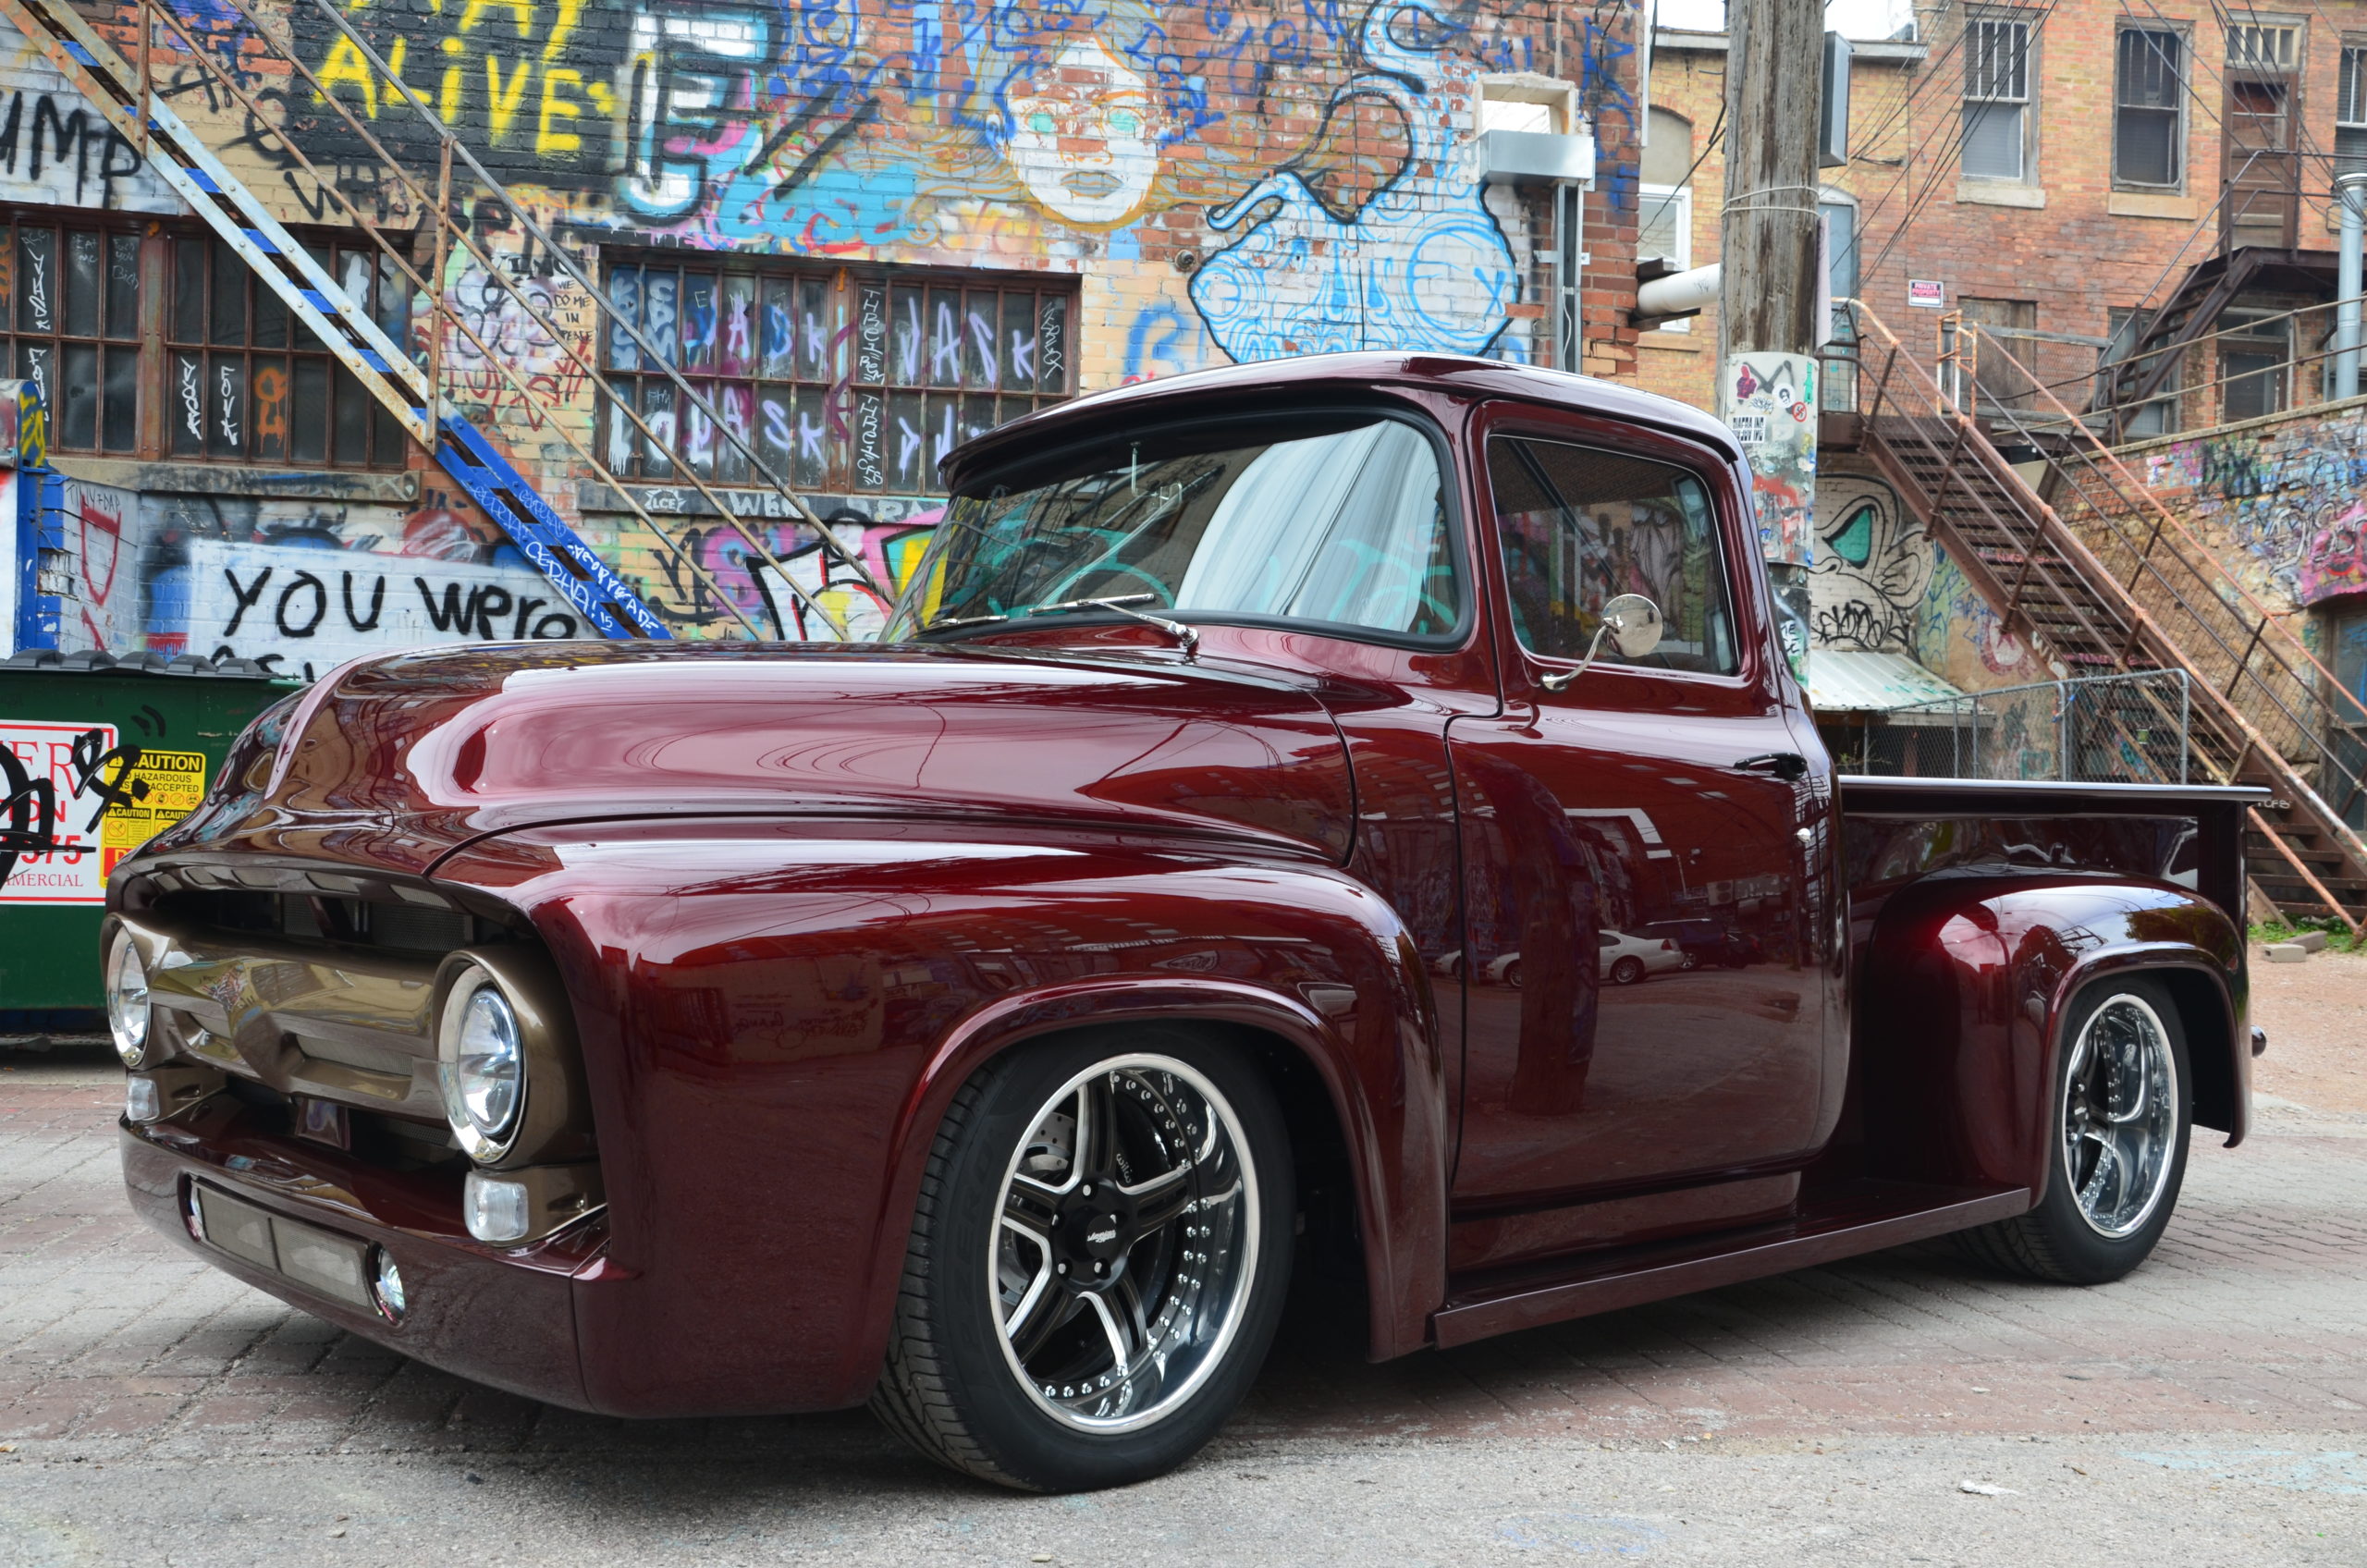
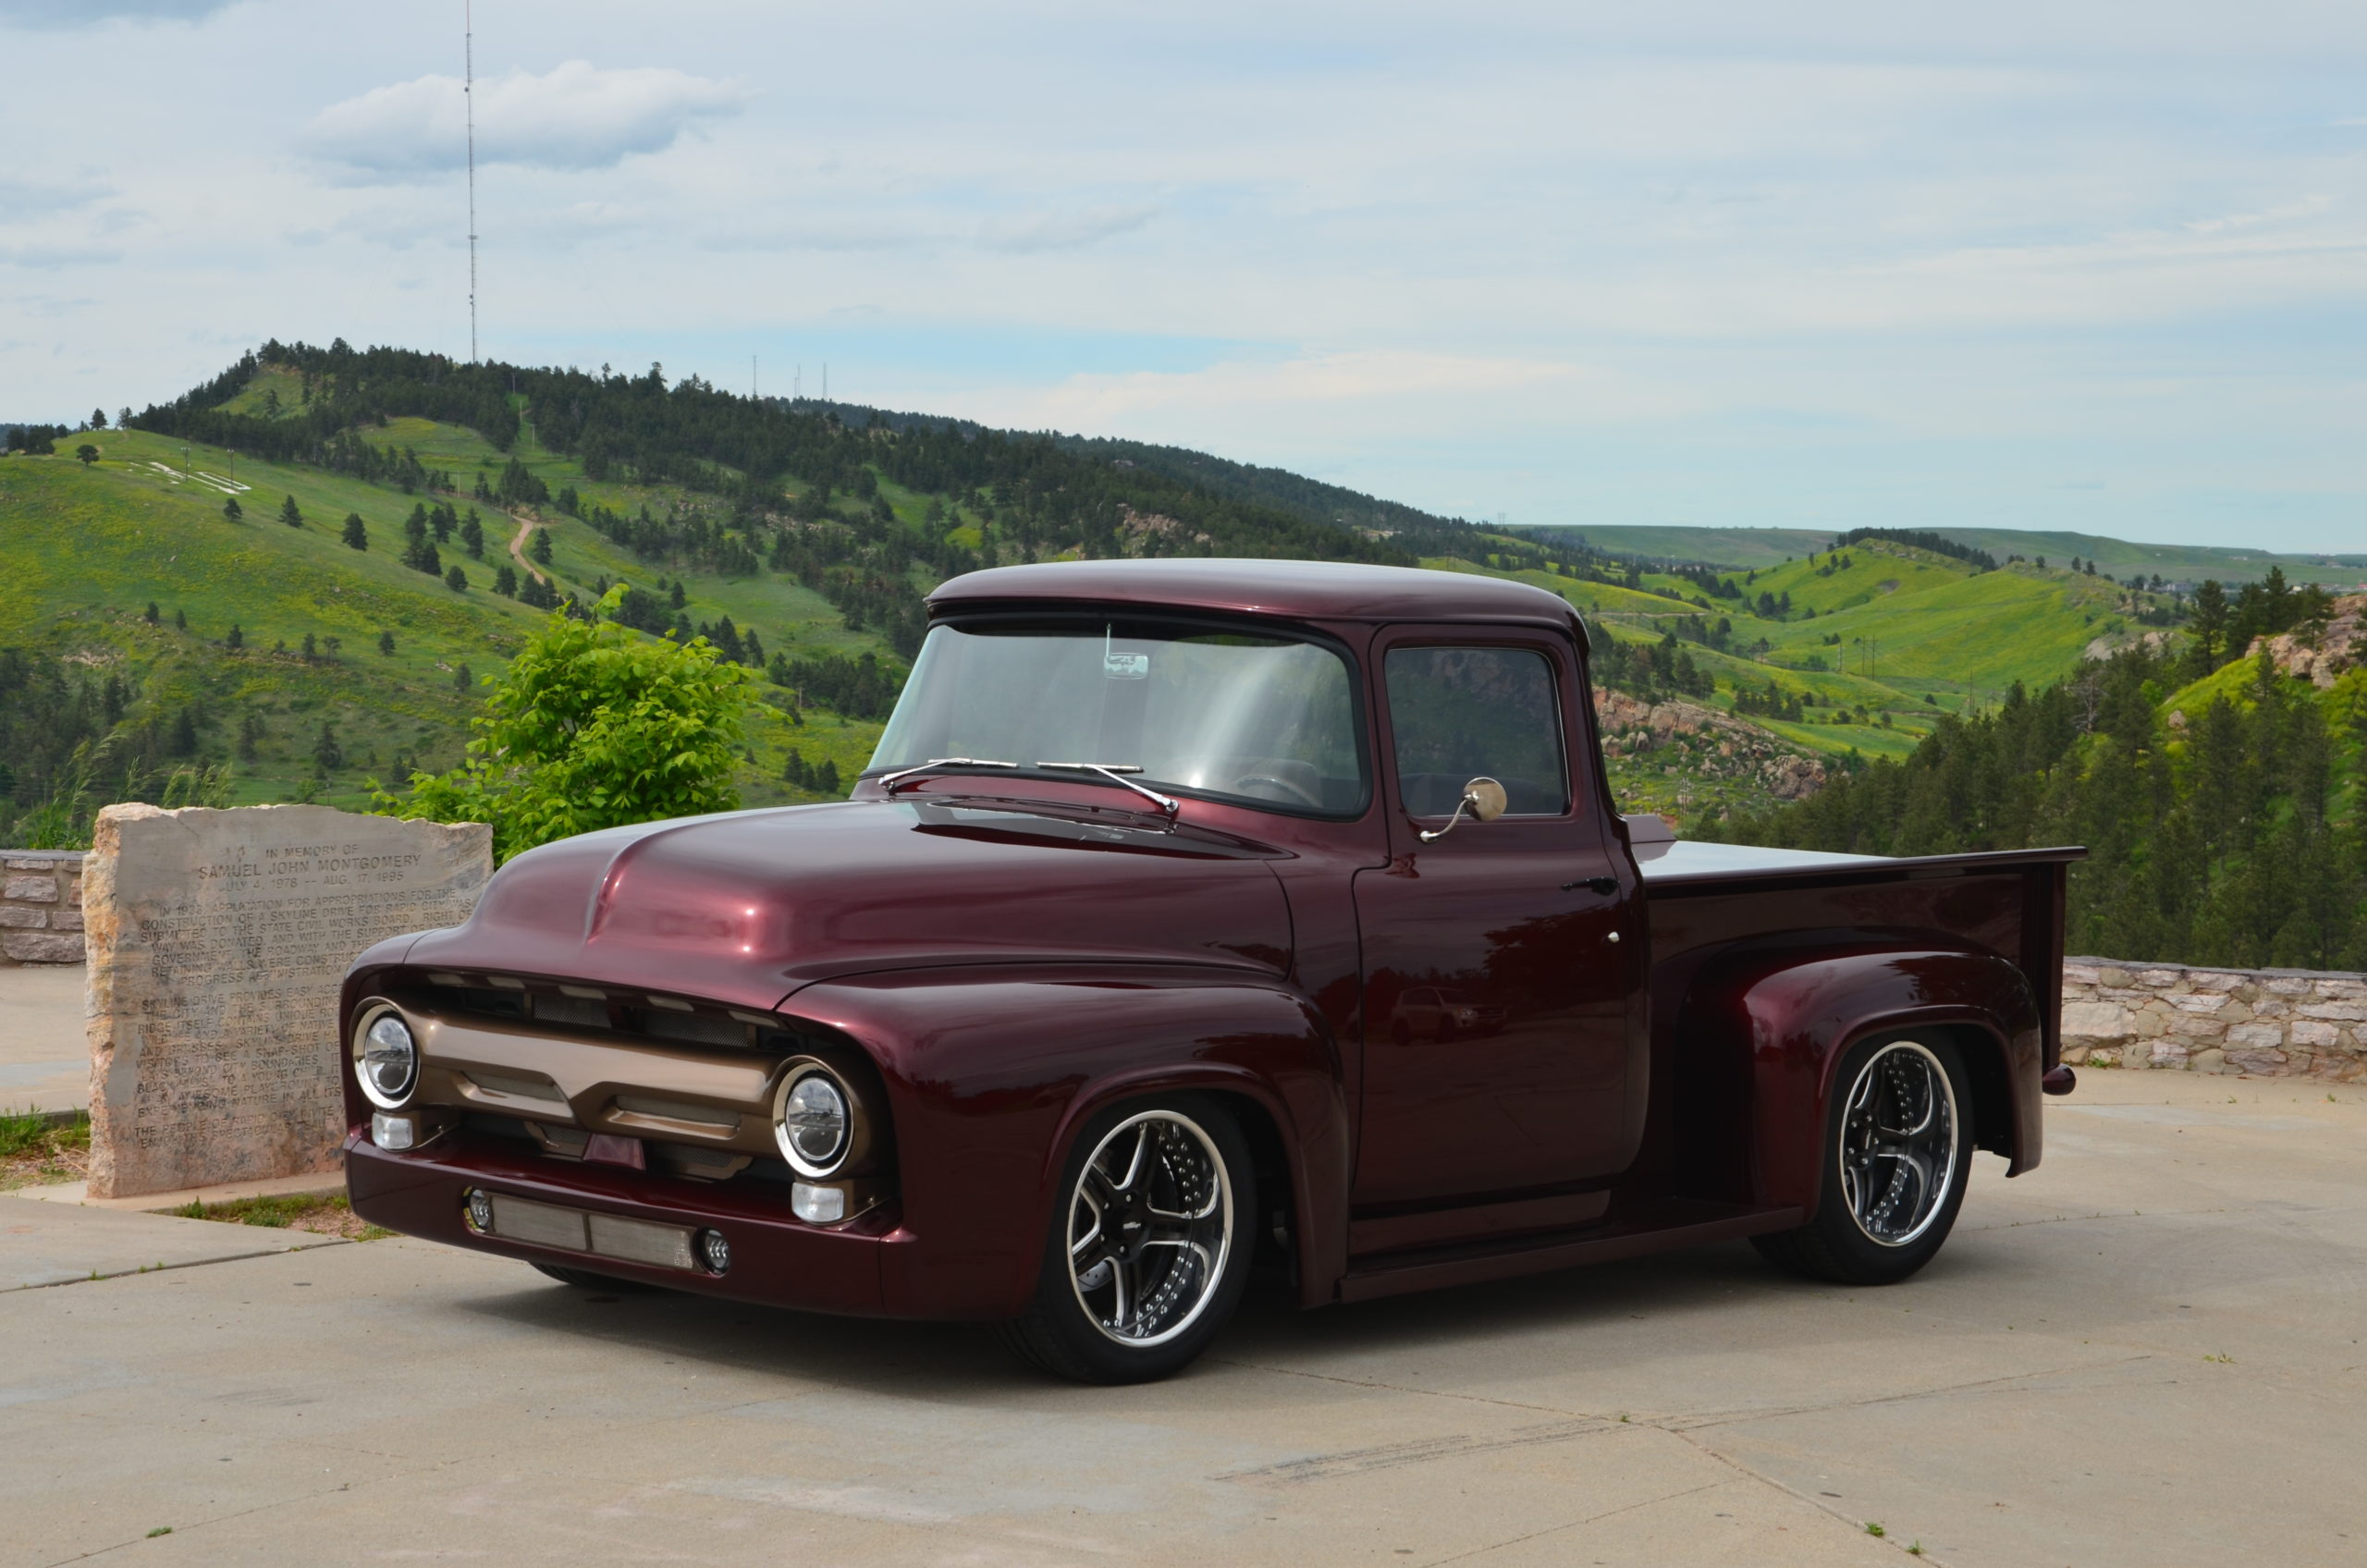
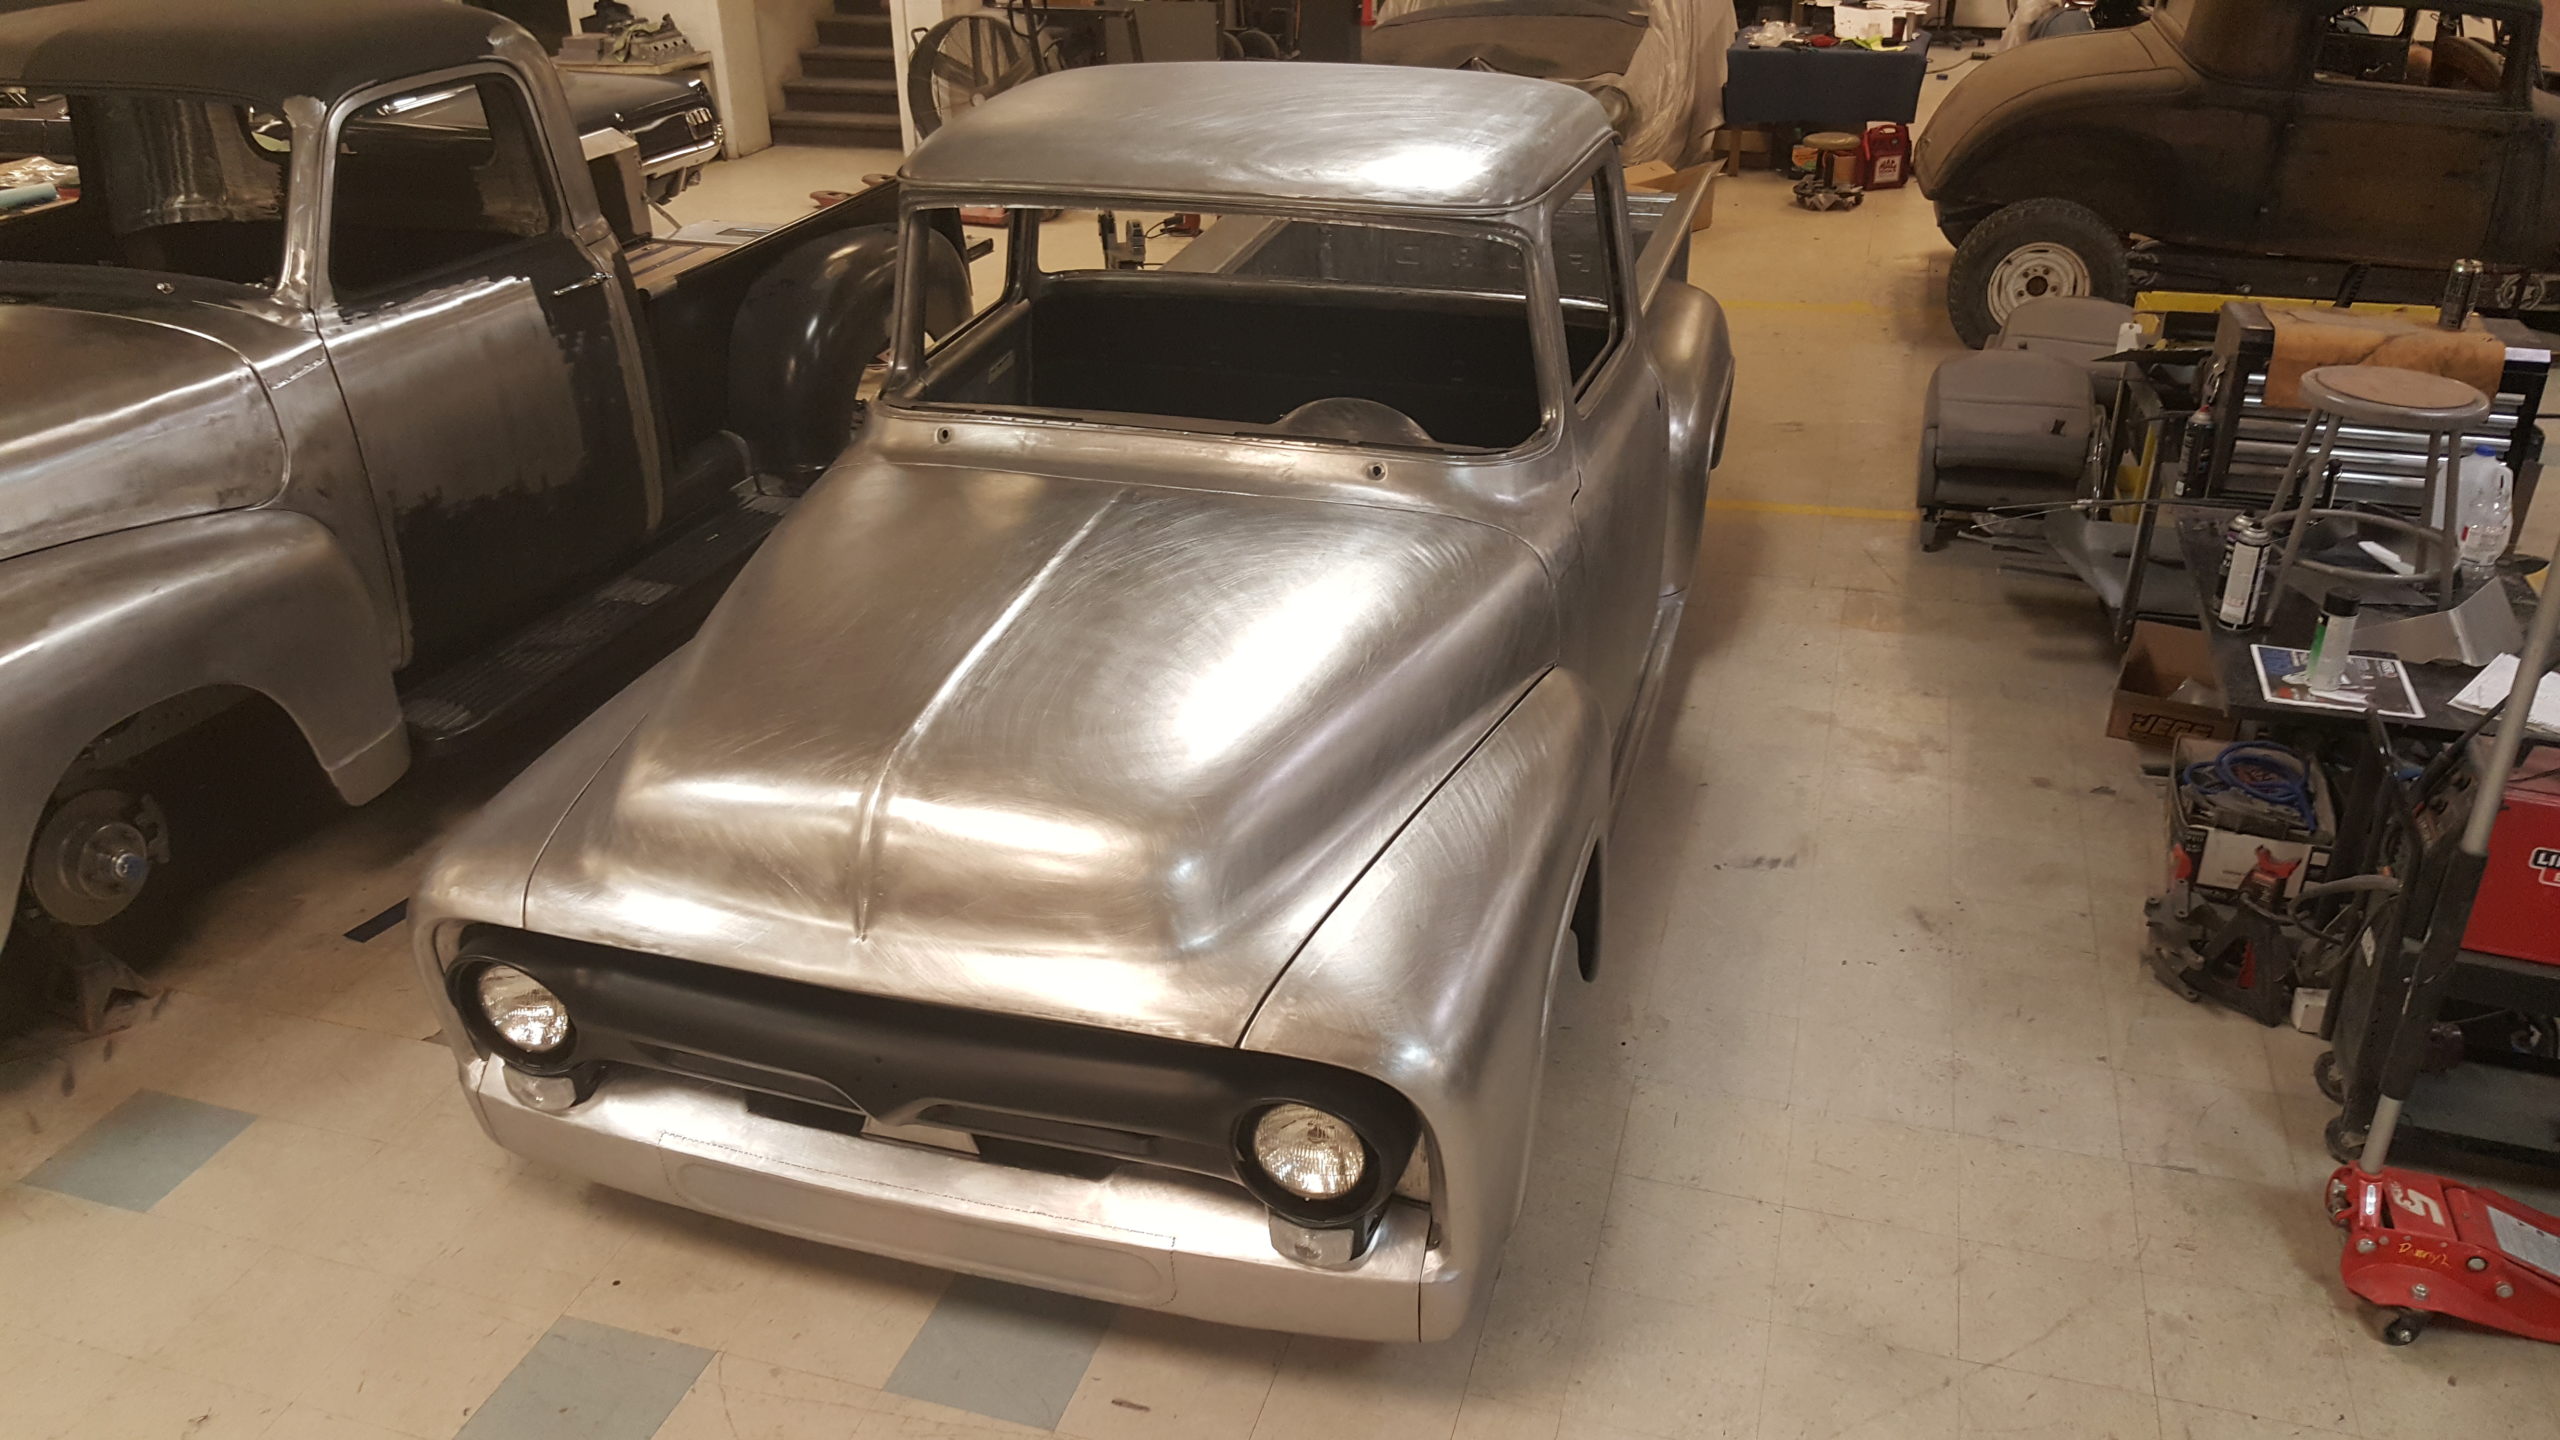
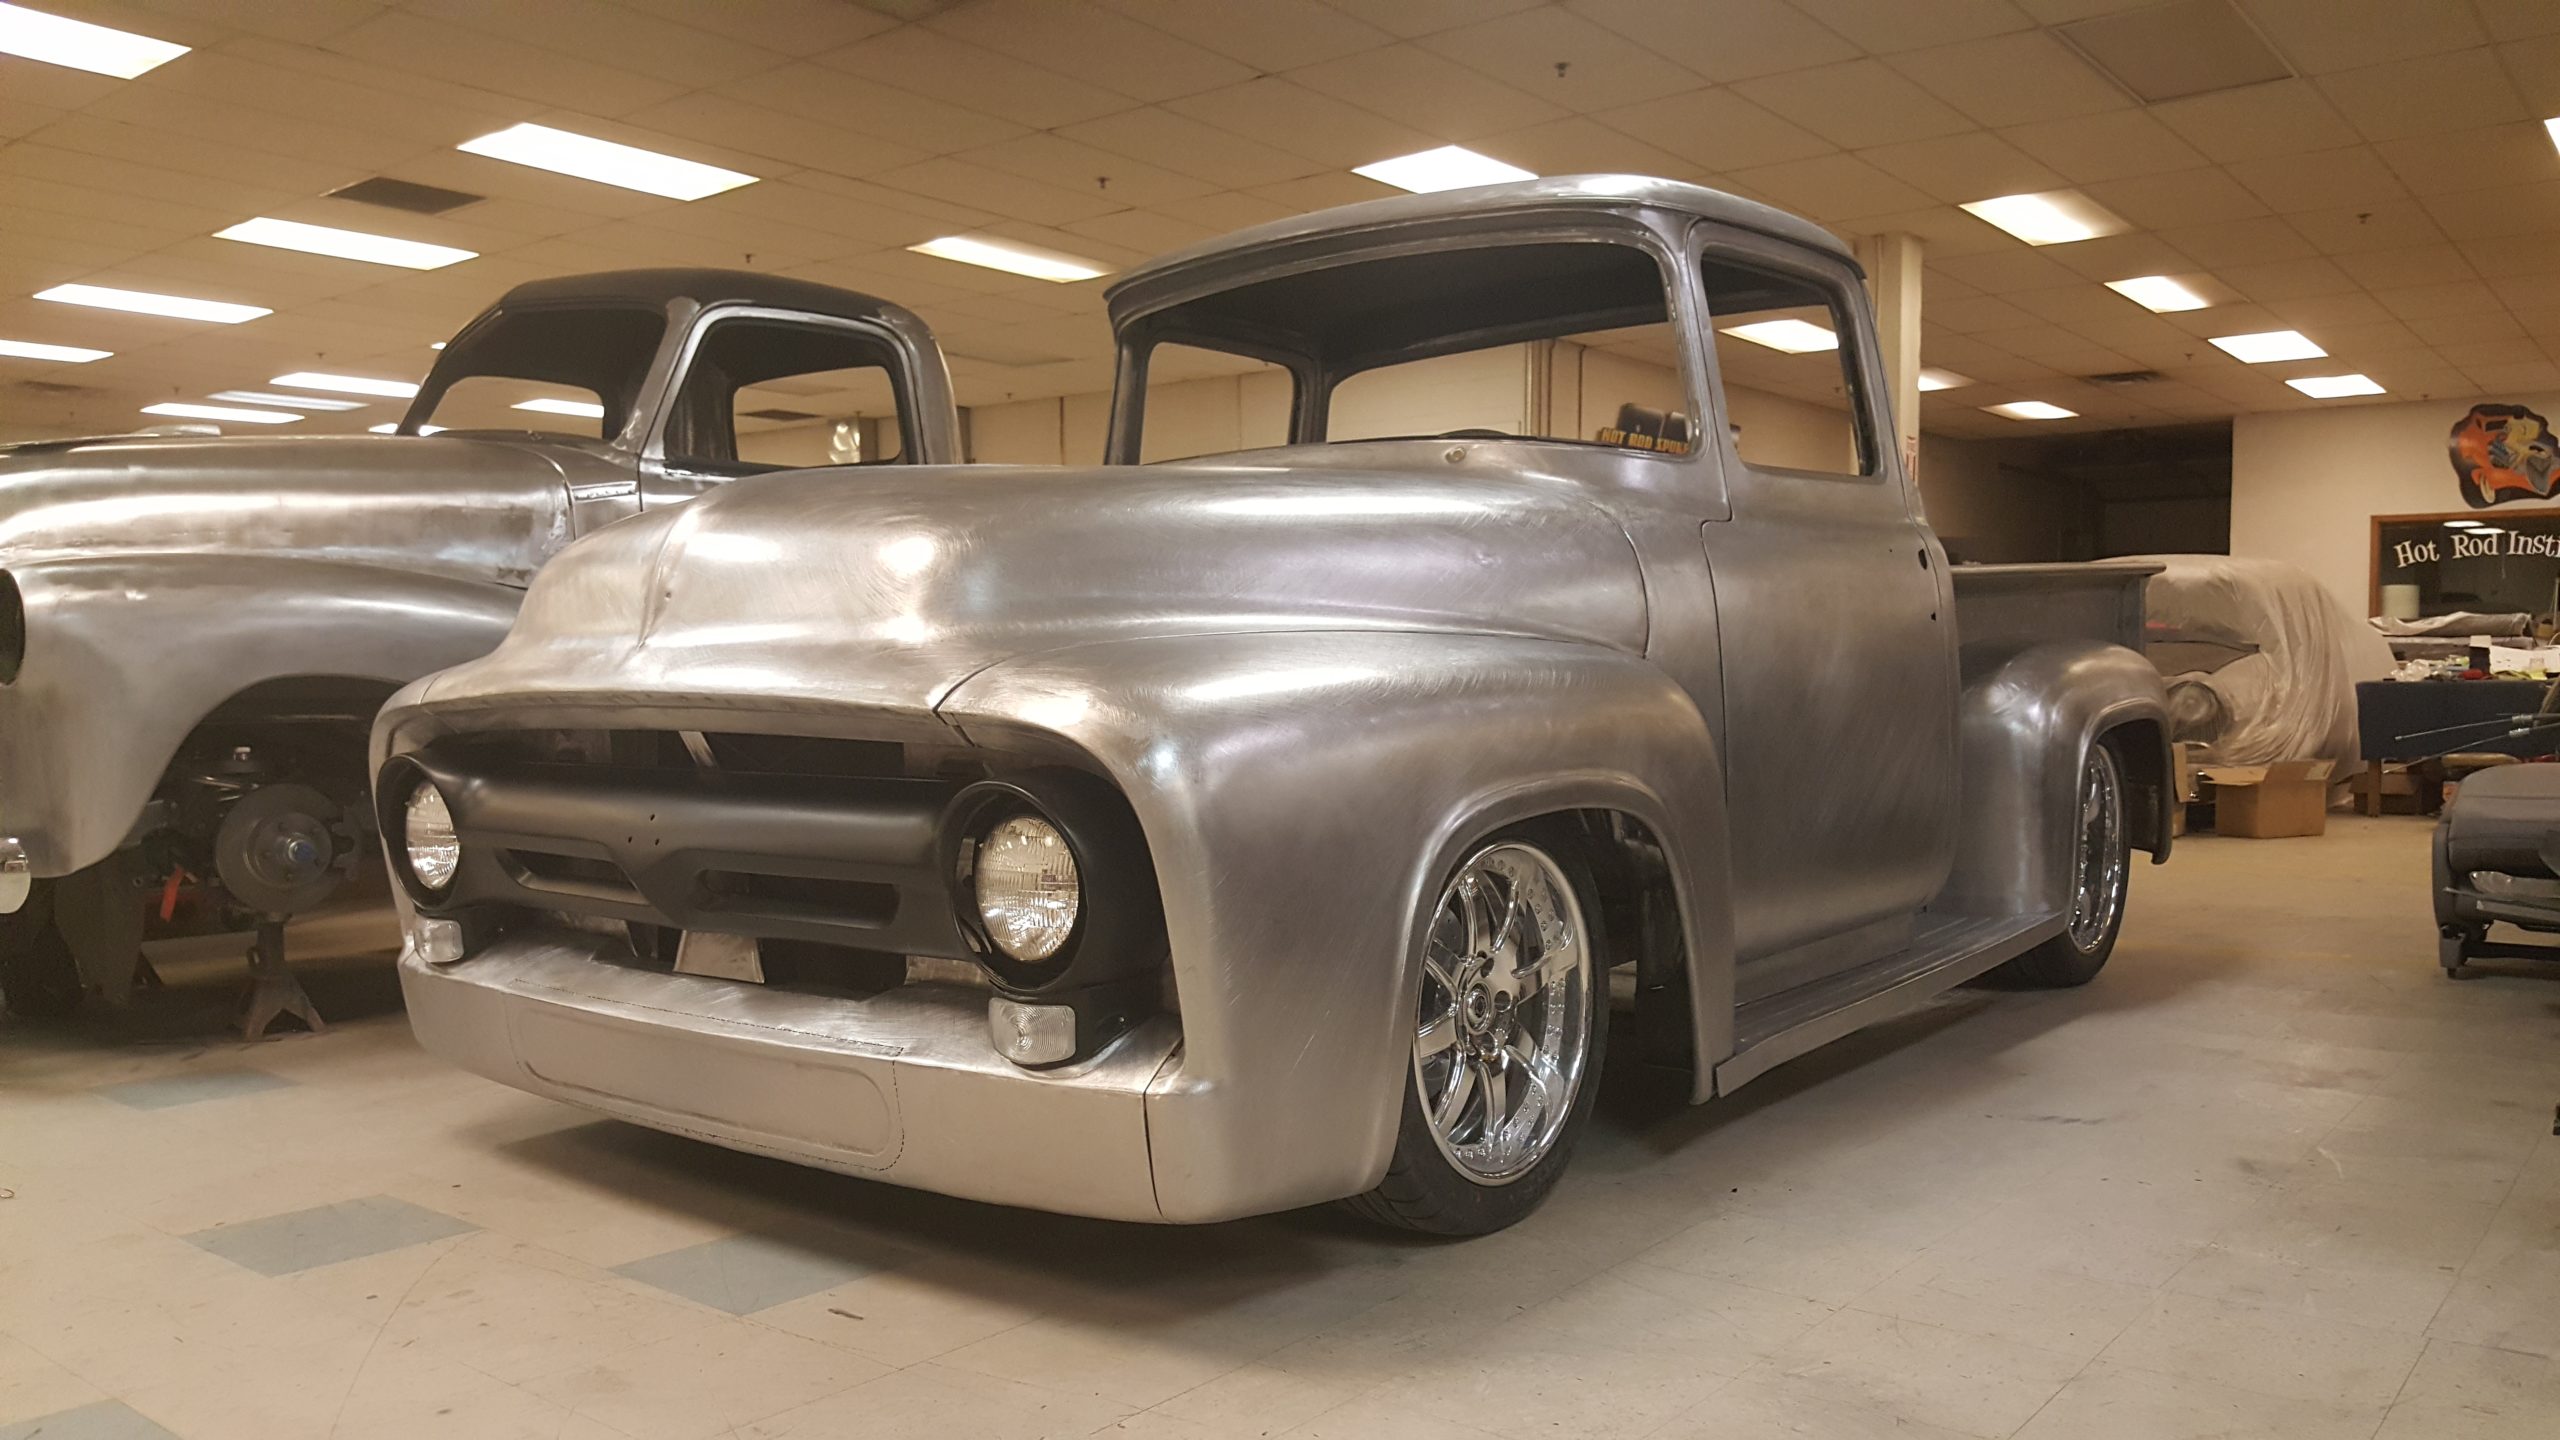
Now for Body mods; most all the body mods are very subtle also done by Jason Millard. Let’s start with the front fenders. The fenders on these fords of the 50’s have very large wheel opening. TCI did a good job centering the wheel in the opening, but we thought we should bring the rear of the front fender opening and move it forward 2 inches. It just gives it a better cleaner look that is not very noticeable but nice. One more thing we do to all our builds is we welded in some 3/16 round rod to the inside lip of all the fenders. It smooths them up and ads a little strength to them, no sharp edges. Actually, on this build we added the round rod to every sharp edge of metal on the entire truck. The doors on these trucks have square corners, well that did not work for us, we rounded all square corners. With nicely painted running boards, person never wants to step on them. So, we took the running boards and cut a good 2 inch off them to make them narrower, now easy to step over the running board instead of on them. Also, the way the boards fit to the fenders was a little out of place for us, so we made the running boards fit up to the fenders much better than Ford did. Any factory seams on the truck was cut out and the welds was hammered smooth, like the truck had no seams at all, one big stamping. The rear of the bed was crying for a roll-pan, so we gave it a very tasteful one with the exhaust tips recessed up into the roll pan. I have always like the 37 Ford car taillights. The 37 taillights got recessed into the stake pockets down low, very nice look. Mark wanted to make sure the person behind him could see the lights and yes, they can see those LED light for a good distance away from Speedway Motors.
The front grille was a nice chrome one, well I’m just not a chrome guy, so we sanded it off, removed and emblem and filled some holes and painted it the brown accent color. A good friend of ours cut out some nice bezels so we could give the front of the truck a finished look and added some fine stainless mess. This really cleaned the front end up and with the contrasting medium brown paint, it was a nice finishing touch. We did keep the stainless headlight bezels. No front or rear bumpers, but we did do some nice driving lights in the front lower pan.
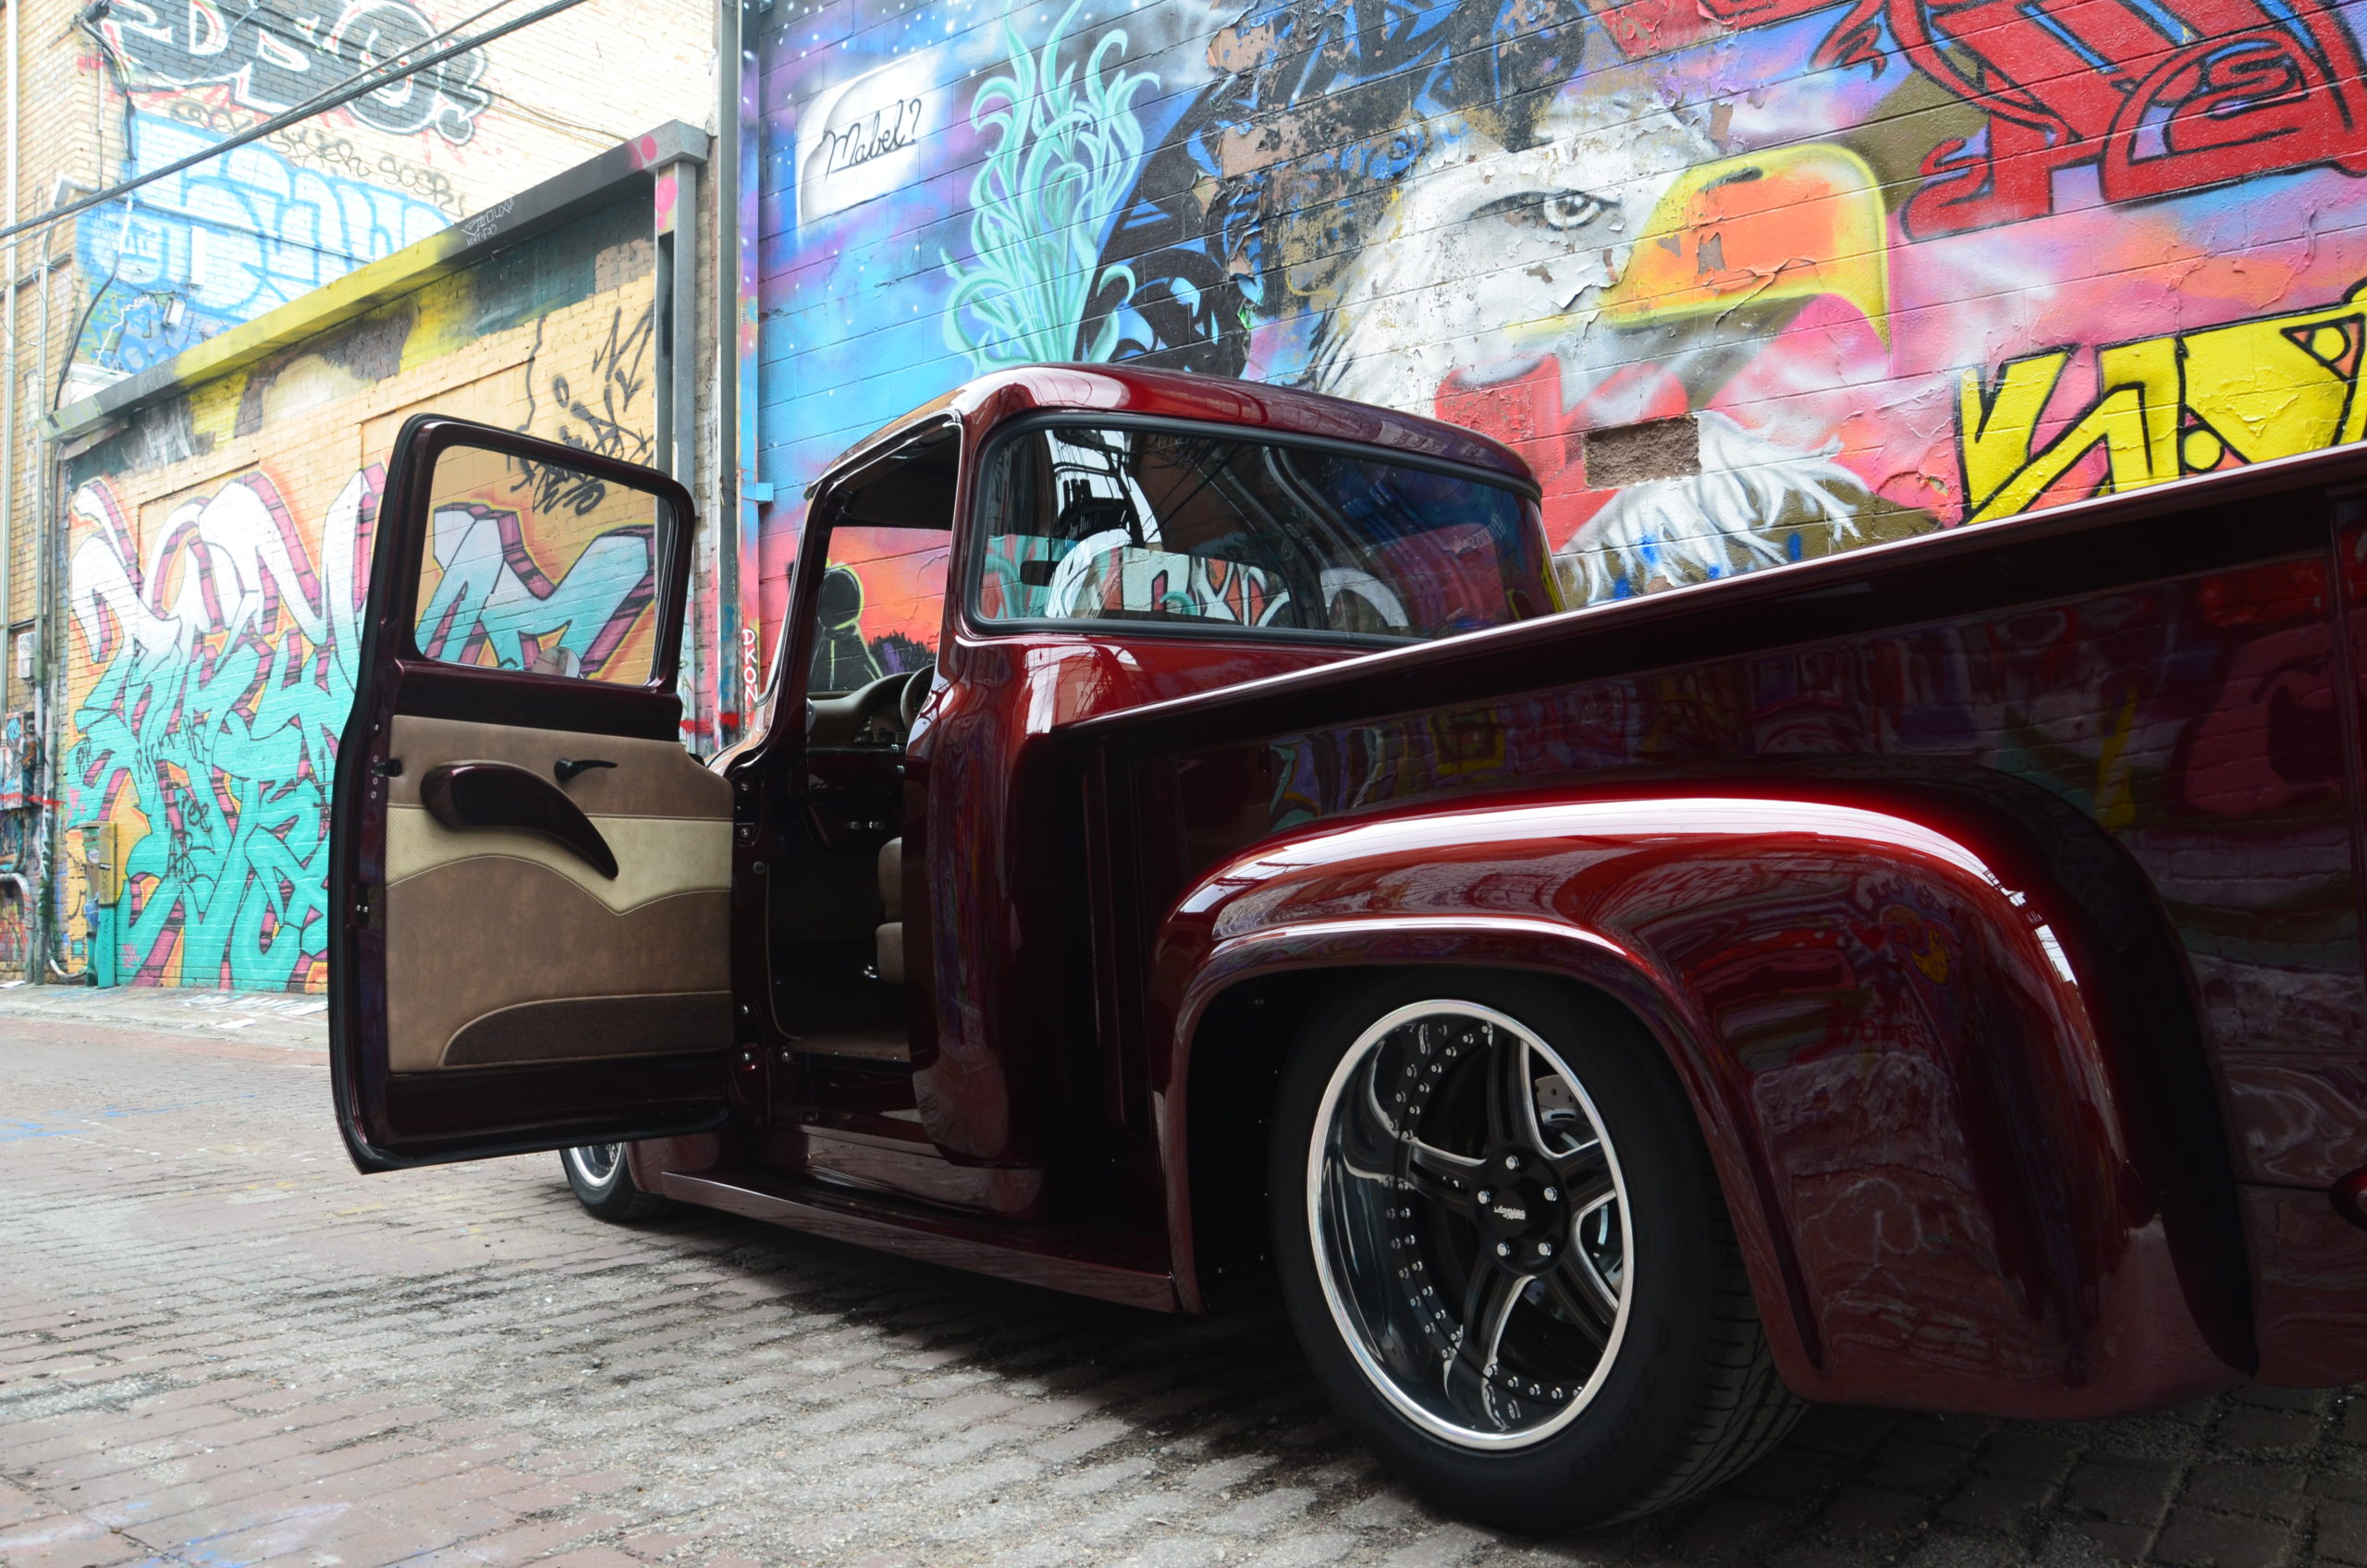
The Paint is from House of Kolor, Candy Brandy Wine. The brandy wine is much more user friendly since HOK made a base coat candy version of the iconic Candy Brandy Wine. We used a black sealer, just like Jon K. himself told us to do. It gives that deep on the dark side rich color. Our head paint in the Rod Shop, Kelly Hebbring can really lay the paint down. Then the zero texture and extreme gloss was brought forth by the hard work and keen eye of Danny LaRue. Between Kelly and Danny, wow it is as nice as it comes. Kelly laid down 3 coats of the base candy and 5 coats of the clear, so Danny could sand a couple coats off and polish and polish. Did you notice the tasteful stripping and lettering on the truck? Eldon Amero our Refinishing instructor is very handy with a pin stripping brush. Mark is also very patriotic and had GBA on his license plate, it means God Bless America. So instead of Mark having to tell everyone what it GBA meant he had Eldon paint the word on the tailgate. Pinstripes were tastefully laid down all over the truck; tailgate letters, wheels, steering wheel and don’t forget the cool design on the rear differential and some more I probably forgot about. Headlights was ordered online, no big deal there. The outside mirrors are the swan neck from Speedway Motors. The outside door handles are from Ring Brothers, very nice piece. The upper part of the door handle was pained the accent brown and the lower was left black powder coat.
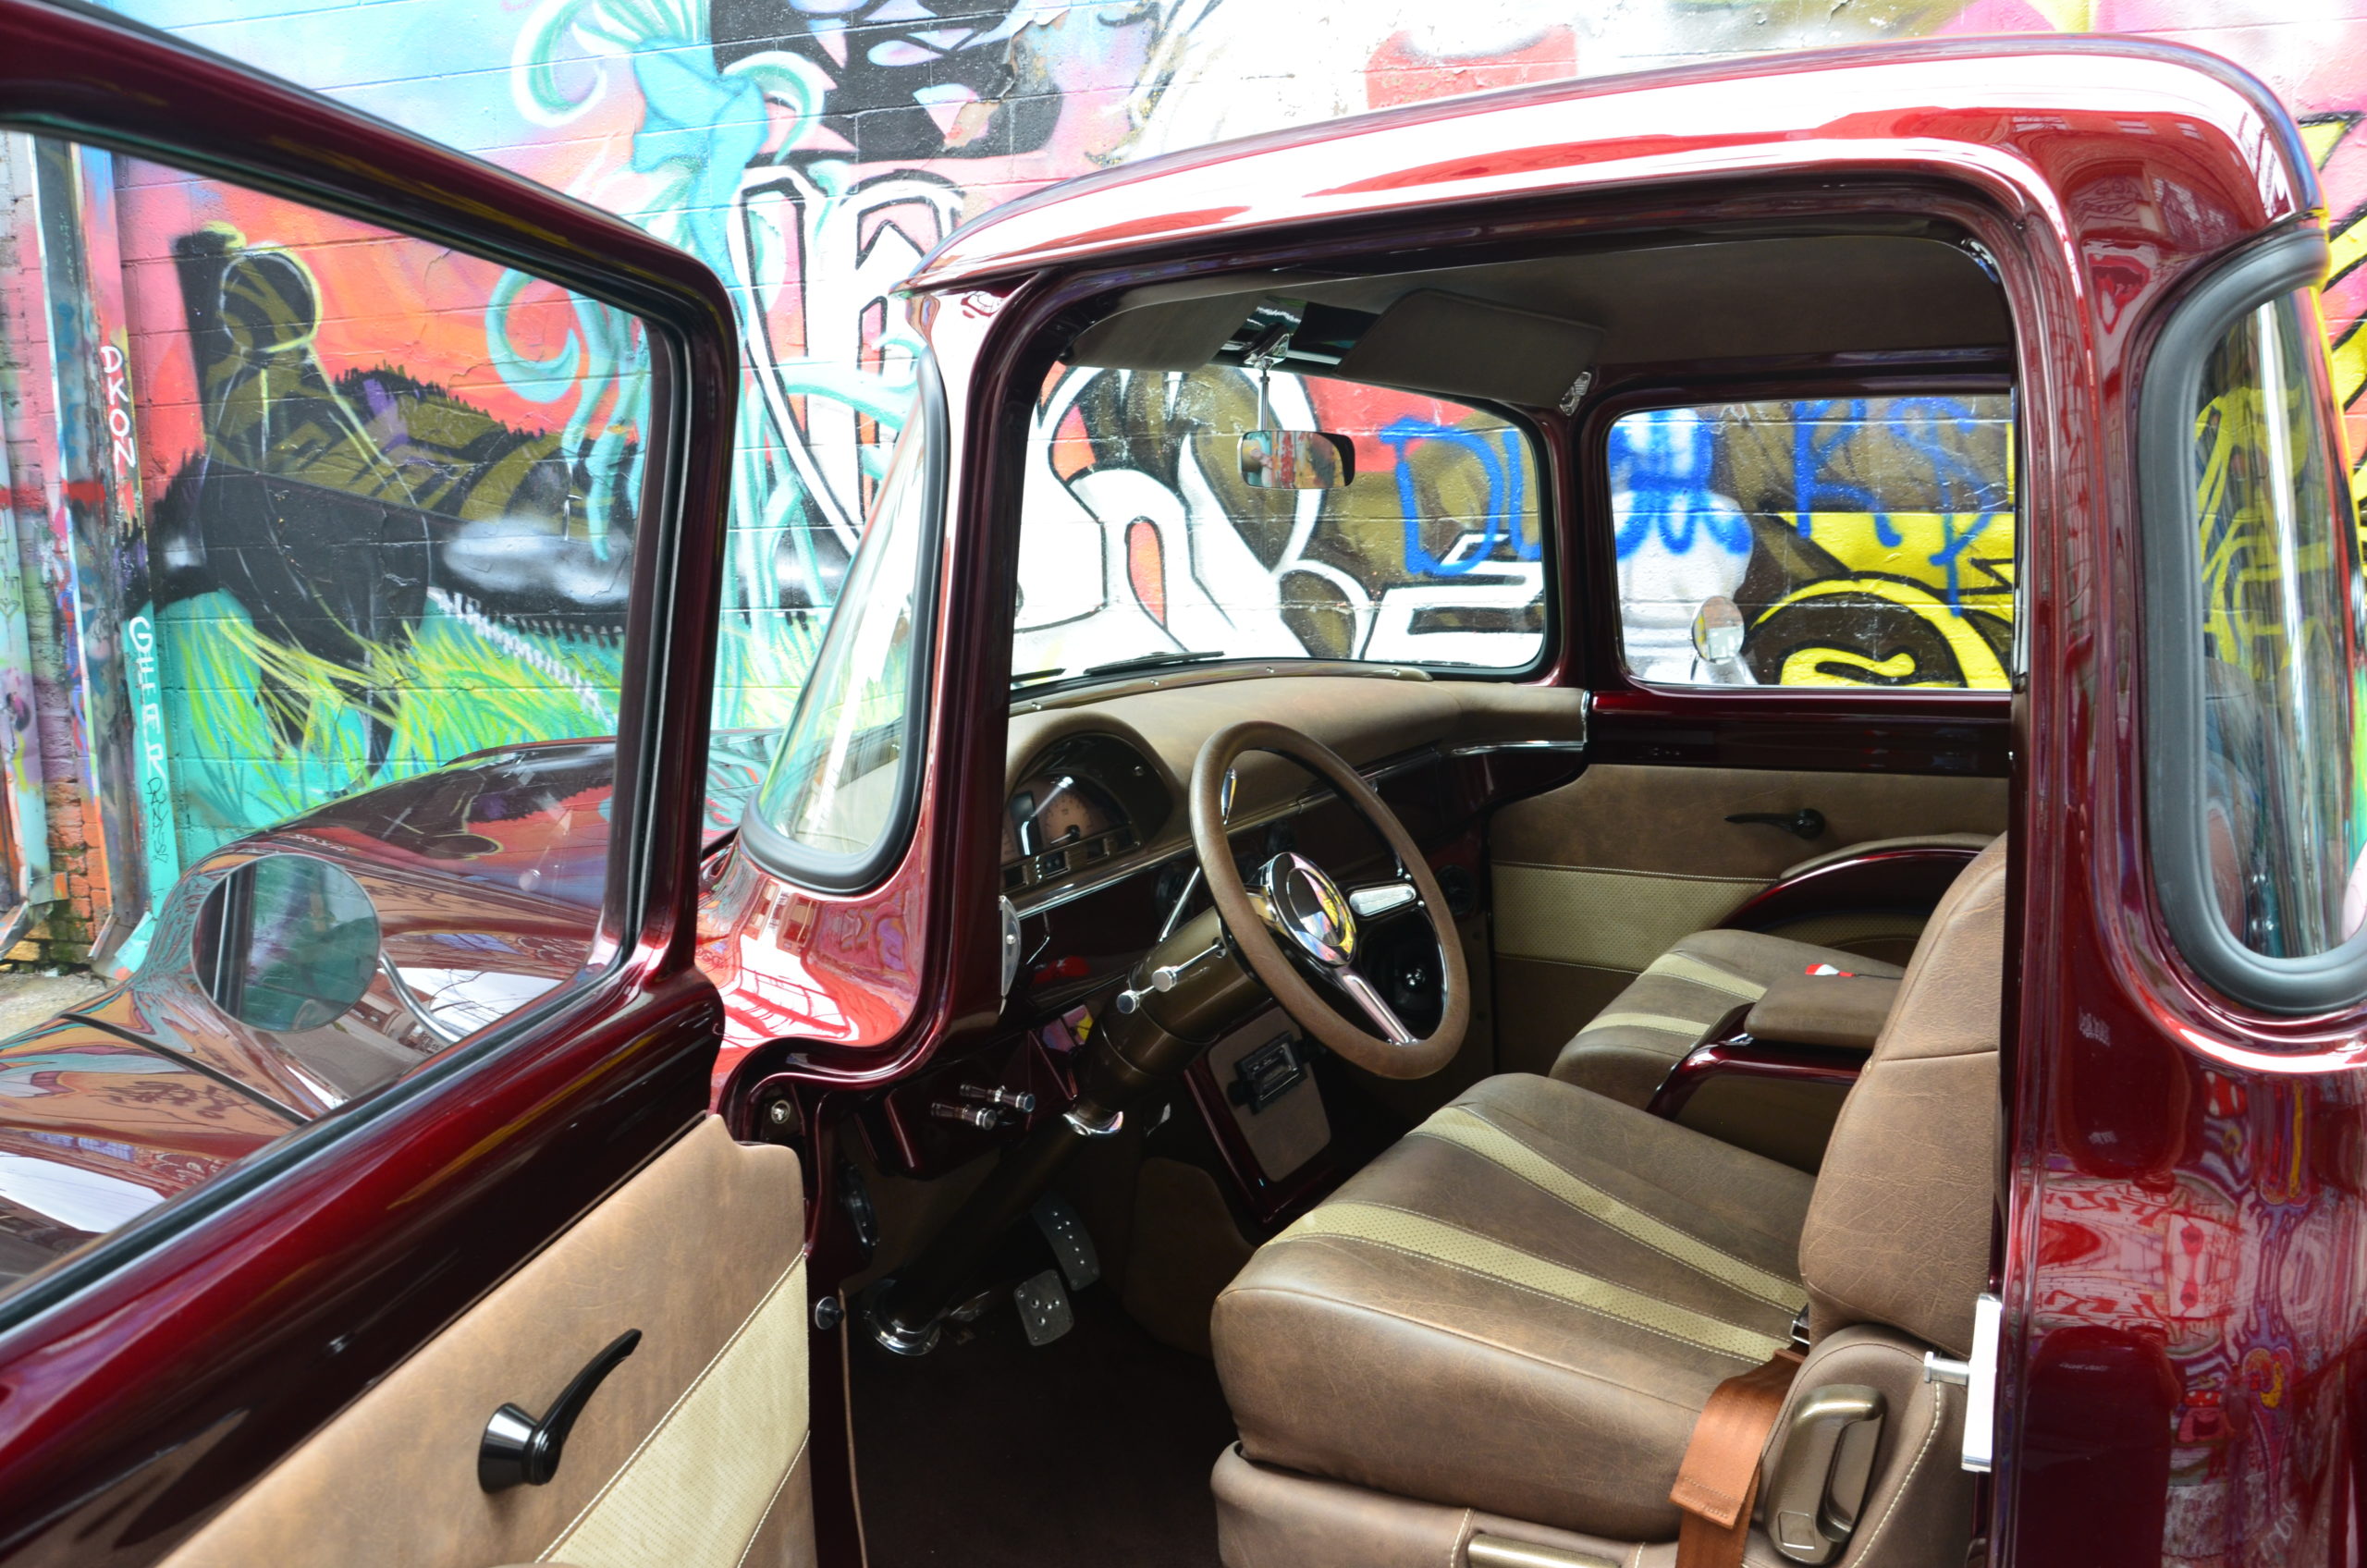
The interior was done very well by the guys in the rod shop. The upholstery was handled by Martin Healy our Upholstery Instructor and he had a little help for a couple HRI graduates. The Dash is removable so the upper part could be cover with the distressed brown material. We separated it with an aluminum strip we got from Speedway. The Dakota Digital gauges was custom colored by Dakota Digital to match the upholstery, very nice. The dash had a lower portion fabricated with AC ducts built in and painted body color with black accents. A center console was fabricated to use as a are rest and store stuff. The console was painted body color except of the lid it was upholstered. Custom built door trim panels and kick panels from .063 sheet aluminum. The arm rest was fabricated from 18-gauge steel and painted body color. Mark wanted a simple radio, easy to use. Custom Auto Sound is the way we went with Pioneer speakers 6” up front in the kick panels and 6x9 behind the seat. It looks good and works great, no big sound here just simple.
The Air Conditioning is from Restomod Air. We installed two manifolds to hook up the lines, one on the inter firewall out of site, the other on the inner fender skirt. Easy hook up and clean look. Everything on the AC has the black accents to match our theme.
Wiring harness came form American Auto Wire, very nice harness. Mike Hayes our lead mechanical and reassembly guy in the rod shop wired the truck and did most of the reassembly. Mike is very neat and meticulous, and did a wonderful job making sure everything was detailed and working perfectly. Mike’s attention to detail really helped put this build over the top.
Build Sheet
Manufacturers
- All American Billet - Front engine runner
- American Autowire - Wiring harness
- American Legend Wheels - wheels: Up front we use 8 x 18 and the rear wheels are 10 x 19
- Be Cool Radiators - Aluminum radiator
- Borla Performance - Mufflers
- Currie Enterprises - Rear axels and housing
- Dakota Digital - Gauges
- Hooker Exhaust Systems - Cast iron exhaust manifolds
- House Of Kolor - Candy Brandy Wine paint
- IDIDIT, LLC. - Steering column
- K&N Engineering, Inc. - Air filter
- LizardSkin - Sound dampening material
- Lokar Performance Products - Engine and trans dipstick and shift linkage
- Nu-Relics Power Windows - Power windows
- Optima Batteries - Red top battery
- Pirelli Tire | USA - P-Zero tires front 235/50R 18 and the rear is 295/45R 19
- RESTOMOD AIR - Air Conditioning
- RideTech - Coilover shocks
- Ringbrothers - Outside door handles
- SATA by Dan-AM Co. - Spray equipment
- Speedway Motors, Inc. - Outside mirrors
- Steele Rubber Products - Weather stripping
- Total Cost Involved Engineering Inc. - Full Chassis
- Wilwood Brakes - 12-inch brakes all the way around
Shops
- Hot Rod Institute - Builder, Body & Paint work, Fabrication, Upholstery